low glycemic index food list pdf

Low Glycemic Index Food List: A Comprehensive Guide

Navigating dietary choices for stable blood sugar requires a detailed understanding of the glycemic index (GI) and glycemic load (GL) of foods․

This guide provides a comprehensive overview, referencing resources like the Linus Pauling Institute and international tables for informed meal planning․

Understanding Glycemic Index (GI)

The Glycemic Index (GI) is a ranking system for carbohydrates based on their immediate effect on blood glucose levels․ It measures how quickly a food causes blood sugar to rise compared to a standard, like pure glucose or white bread․

Determining a food’s GI involves testing healthy volunteers with 50 grams of the food’s carbohydrate and comparing the resulting blood sugar response to the control food․ Foods are categorized as low, medium, or high GI․

Understanding the GI is crucial for managing blood sugar, particularly for individuals with diabetes․ Resources like the Linus Pauling Institute offer detailed information and tables of GI values for various foods, aiding in informed dietary choices․

However, GI alone doesn’t tell the whole story; glycemic load (GL) provides a more complete picture․

What is Glycemic Index?

The Glycemic Index (GI) represents a numerical value assigned to foods containing carbohydrates, indicating their rate of impact on blood glucose levels after consumption․ It’s a relative ranking, using glucose as a reference point with a GI of 100․

Essentially, GI quantifies how quickly a carbohydrate-containing food raises blood sugar․ The process involves feeding healthy volunteers a specific amount of carbohydrate (typically 50g) from the test food and monitoring their glucose response over two hours․

This response is then compared to that of a standard carbohydrate source․ Understanding the GI allows individuals to make informed food choices to manage blood sugar levels effectively, as highlighted by resources like the Linus Pauling Institute․

It’s a valuable tool, but should be considered alongside other factors like glycemic load․

GI Scale and Food Categories

The Glycemic Index (GI) scale categorizes foods based on their impact on blood glucose, providing a practical framework for dietary choices․ Foods are broadly classified into three categories: Low, Medium, and High GI․

Low GI foods have a GI of 55 or less, causing a slower and more gradual rise in blood sugar․ Medium GI foods range from 56 to 69, offering a moderate impact․

Foods with a GI of 70 or more are considered High GI, leading to a rapid increase in blood glucose levels․

These classifications, as noted by the Linus Pauling Institute, help individuals select foods that support stable energy levels and blood sugar control․ Remember that individual responses can vary․

Low GI Foods (55 or less)

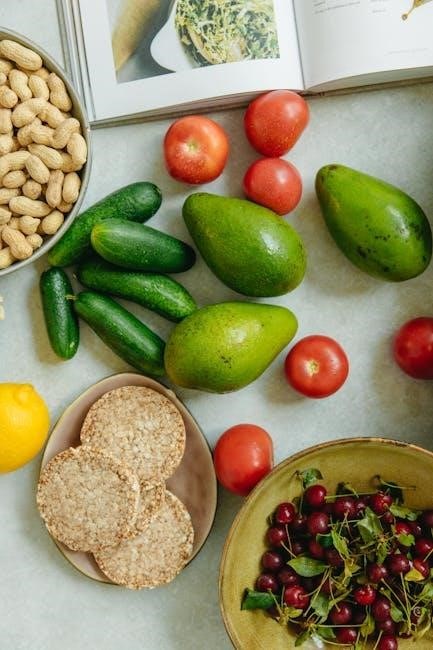
A diverse range of foods fall into the Low GI category (55 or less), offering excellent choices for blood sugar management․ These include most non-starchy vegetables like leafy greens – spinach, kale, and lettuce – alongside broccoli and cauliflower․

Certain fruits, such as berries (strawberries, blueberries, raspberries), apples, pears, and cherries, also boast a low GI․

Regarding grains and starches, quinoa, steel-cut or rolled oats, and barley are beneficial options․

Furthermore, lean proteins (chicken, turkey, fish), legumes (beans, lentils), nuts, seeds, and healthy fats like avocado and olive oil have minimal impact on GI, complementing a low GI diet․

Medium GI Foods (56-69)

Foods with a Glycemic Index between 56 and 69 are considered to have a moderate impact on blood glucose levels․ While not as ideal as low GI options, they can be included in a balanced diet with mindful portion control․

Examples of medium GI foods include certain varieties of rice, like long-grain white rice, and some whole-grain breads․

Sweet corn and some root vegetables, like potatoes (depending on preparation method), also fall into this category․

Orange juice, while providing vitamins, has a medium GI․ It’s crucial to consider the overall carbohydrate content and combine these foods with protein and healthy fats to mitigate blood sugar spikes․

High GI Foods (70 or more)

Foods boasting a Glycemic Index of 70 or higher cause a rapid and significant increase in blood glucose levels․ Frequent consumption of these foods can contribute to insulin resistance and increased risk of type 2 diabetes․

Common examples include white bread, cornflakes, white rice, and potatoes (especially mashed or baked)․

Sugary drinks like soda and fruit juice (apple juice specifically mentioned) also fall into this high GI category․

Sucrose (table sugar) and glucose are quickly absorbed, leading to a substantial glucose surge․ Limiting intake of these foods and prioritizing lower GI alternatives is essential for blood sugar management and overall health․

Glycemic Load (GL) – A More Complete Picture

While the Glycemic Index (GI) provides valuable insight, it doesn’t account for the quantity of carbohydrates consumed in a typical serving․ This is where Glycemic Load (GL) steps in, offering a more holistic assessment of a food’s impact on blood sugar․

GL considers both the GI and the carbohydrate content of a serving․ It provides a more accurate representation of how a food will affect glucose levels, as portion size significantly influences the response․

Understanding GL is crucial for effective dietary planning, especially for individuals managing diabetes or aiming for stable energy levels․ It allows for a nuanced approach beyond simply categorizing foods as “good” or “bad” based solely on GI․

Calculating Glycemic Load

Determining a food’s Glycemic Load (GL) involves a simple formula: GL = (GI x Carbohydrate Content in Grams) / 100․ This calculation provides a numerical value representing the food’s overall impact on blood glucose levels․

For example, a food with a GI of 50 and 20 grams of carbohydrates would have a GL of 10 (50 x 20 / 100)․ Researchers often utilize a standardized 50-gram carbohydrate portion when establishing a food’s GI, as noted by the Linus Pauling Institute․

Accurate carbohydrate counting is essential for precise GL calculation․ Online databases and food labels are valuable resources for obtaining this information, aiding in informed dietary choices․

Why GL is Important

Glycemic Load (GL) offers a more practical and complete assessment of a food’s effect on blood sugar than the Glycemic Index (GI) alone․ While GI indicates how quickly a food raises glucose, GL considers both the speed and the amount of carbohydrate consumed․

A food with a high GI but low carbohydrate content may have a moderate GL, making it a more sensible choice than a food with a moderate GI but high carbohydrate load;

Understanding GL is particularly crucial for individuals managing diabetes or aiming for stable energy levels․ It allows for more nuanced dietary planning, promoting better blood glucose control and overall health, as emphasized by resources like the Simple Diabetes Meal Plan․

Low GI Food List – Detailed Breakdown

Exploring specific food groups reveals numerous low-GI options, including fruits, vegetables, grains, and protein sources, aiding in balanced meal construction․

Fruits with Low Glycemic Index

Selecting fruits wisely is crucial for managing blood sugar levels․ Berries – strawberries, blueberries, and raspberries – consistently demonstrate a low GI, making them excellent choices for a healthy diet․ Apples and pears, enjoyed with their skin, offer fiber that slows sugar absorption, contributing to a lower glycemic response․

Cherries, while naturally sweet, also fall into the low GI category․ However, portion control remains important, as fruit contains natural sugars․ Remember that fruit juices, like apple juice, often have a higher GI due to the concentrated sugars and lack of fiber․ Prioritizing whole fruits over juices is generally recommended for optimal blood glucose control․

These fruits provide essential vitamins, minerals, and antioxidants, supporting overall health while minimizing impact on blood sugar․

Berries (Strawberries, Blueberries, Raspberries)

Berries – encompassing strawberries, blueberries, and raspberries – stand out as exceptional choices for individuals seeking low glycemic index foods․ Their relatively low sugar content, combined with a significant fiber presence, contributes to a slower release of glucose into the bloodstream․ This characteristic makes them ideal for maintaining stable blood sugar levels and supporting overall metabolic health․

These vibrant fruits are also packed with antioxidants, offering protection against cellular damage․ Enjoying a serving of berries can satisfy sweet cravings without causing significant spikes in blood glucose․ They are versatile, perfect for snacks, smoothies, or additions to breakfast cereals․

Remember to consume them in moderation as part of a balanced diet․

Apples

Apples are a readily available and nutritious fruit that generally fall into the low to medium glycemic index range․ The specific GI can vary slightly depending on the apple variety, with some being lower than others․ However, they consistently offer a healthier alternative to many other fruit options when managing blood sugar levels․

A key factor contributing to apples’ lower GI is their fiber content, particularly pectin․ Pectin slows down the absorption of sugar, preventing rapid glucose spikes․ Consuming apples with the skin on further enhances their fiber benefits․

Enjoy apples as a satisfying snack or incorporate them into meals for a touch of natural sweetness․

Pears

Pears, like apples, are a fantastic fruit choice for individuals seeking to maintain stable blood glucose levels․ They generally exhibit a low to moderate glycemic index, making them a suitable addition to a balanced diet․ Different pear varieties may have slightly varying GI values, but overall, they are considered a healthier option compared to many processed foods and sugary snacks․

The fiber content within pears plays a crucial role in slowing down sugar absorption․ This fiber, combined with the natural sugars present, results in a more gradual rise in blood sugar․ Consuming the pear with its skin intact maximizes the fiber intake and nutritional benefits․

Pears offer a sweet and satisfying treat that supports overall health and wellness․

Cherries

Cherries, particularly tart cherries, present a relatively low glycemic index option within the fruit category․ While sweeter cherry varieties may have a slightly higher GI, they still generally fall within a manageable range for individuals monitoring their blood sugar levels․ The specific GI value can vary based on the type of cherry and its ripeness․

The natural sugars in cherries are accompanied by fiber and antioxidants, contributing to a more balanced metabolic response․ These antioxidants offer additional health benefits beyond blood sugar control, supporting overall well-being․ Enjoying cherries in moderation as part of a well-rounded diet is key․

Cherries provide a delicious and nutritious way to satisfy sweet cravings while adhering to a low GI eating plan․

Vegetables with Low Glycemic Index

Vegetables are generally excellent choices for a low glycemic index diet, offering essential nutrients with minimal impact on blood sugar levels․ Non-starchy vegetables, in particular, are packed with fiber, vitamins, and minerals, promoting satiety and overall health․ Incorporating a wide variety of vegetables into your meals is crucial for balanced nutrition․

The fiber content in vegetables slows down the absorption of sugars, preventing rapid spikes in glucose․ This makes them ideal for managing blood sugar and supporting weight management․ Prioritizing vegetables as a significant portion of your plate is a cornerstone of a low GI eating strategy․

From leafy greens to cruciferous vegetables, the options are diverse and flavorful․

Leafy Greens (Spinach, Kale, Lettuce)

Leafy green vegetables – spinach, kale, lettuce, and others – represent some of the lowest glycemic index foods available, making them dietary staples for blood sugar control․ These nutritional powerhouses are incredibly versatile and can be easily incorporated into salads, smoothies, or as side dishes․

Their minimal carbohydrate content and high fiber concentration contribute to a slow and steady release of glucose into the bloodstream․ This prevents the sharp rises and falls associated with higher GI foods․ Furthermore, leafy greens are rich in vitamins, minerals, and antioxidants, offering a wealth of health benefits beyond glycemic control․

Enjoy these greens liberally as part of a balanced, low GI meal plan․

Broccoli & Cauliflower

Broccoli and cauliflower are excellent low glycemic index vegetable choices, offering substantial nutritional value alongside blood sugar benefits․ These cruciferous vegetables contain a moderate amount of fiber and carbohydrates, resulting in a slower glucose release compared to starchy alternatives․

They are packed with vitamins C and K, folate, and various antioxidants, contributing to overall health and well-being․ Versatility is a key strength; enjoy them steamed, roasted, stir-fried, or even as a low-carb substitute for rice or potatoes․

Incorporating broccoli and cauliflower into your diet supports stable blood sugar levels and provides essential nutrients․

Carrots

Carrots, while containing natural sugars, generally fall within the low to medium glycemic index range, making them a suitable vegetable choice for those managing blood sugar․ Their GI can vary based on preparation method; raw carrots tend to have a lower GI than boiled ones due to the intact fiber․

Rich in beta-carotene, fiber, and essential vitamins, carrots contribute to eye health, immune function, and digestive regularity․ Enjoy them as a crunchy snack, grated in salads, or roasted to enhance their natural sweetness․

Moderation is key, but carrots can be a healthy and flavorful addition to a low glycemic index diet․
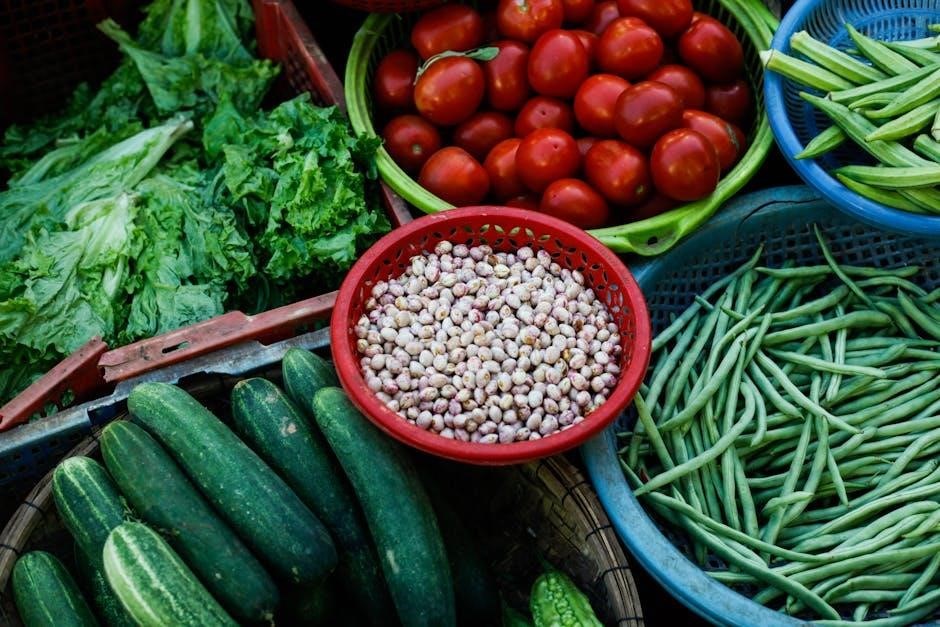
Tomatoes

Tomatoes are celebrated not only for their vibrant flavor but also for their remarkably low glycemic index, making them an excellent choice for individuals focused on blood sugar control․ They are technically fruits, but are often utilized as vegetables in culinary applications․

Packed with lycopene, a powerful antioxidant, tomatoes offer numerous health benefits, including reduced risk of certain cancers and improved heart health․ They are versatile, enjoyed raw in salads, cooked into sauces, or juiced for a refreshing beverage․

Their minimal impact on blood glucose levels allows for generous inclusion in a low GI dietary plan․

Grains & Starches with Low Glycemic Index

Selecting grains and starches wisely is crucial for maintaining stable blood sugar levels, and several options boast a low glycemic index․ These choices provide sustained energy release, unlike refined carbohydrates that cause rapid spikes and crashes․

Quinoa, a complete protein source, is a standout, offering a GI significantly lower than white rice․ Similarly, oats – specifically steel-cut or rolled varieties – provide fiber that slows down glucose absorption․ Barley, another excellent option, contributes to digestive health․

Even sweet potatoes, often perceived as high-GI, can be included in moderation due to their fiber content and nutrient density․

Quinoa

Quinoa stands out as a nutritional powerhouse among grains, offering a remarkably low glycemic index and a wealth of health benefits․ Unlike many refined carbohydrates, quinoa digests slowly, preventing rapid spikes in blood sugar levels, making it ideal for individuals managing diabetes or seeking stable energy․

This complete protein source contains all nine essential amino acids, supporting muscle health and overall well-being․ Its fiber content further contributes to its low GI, promoting satiety and aiding digestion․

Incorporating quinoa into your diet is simple – use it as a rice substitute, add it to salads, or enjoy it as a breakfast porridge․

Oats (Steel-Cut or Rolled)

Oats, particularly steel-cut or rolled varieties, are a fantastic low glycemic index food choice for a healthy breakfast or snack․ They provide a sustained release of energy, unlike processed cereals that cause rapid blood sugar fluctuations․ The soluble fiber, beta-glucan, found abundantly in oats, slows down glucose absorption․

Beta-glucan also contributes to heart health by helping to lower cholesterol levels․ Choosing steel-cut oats offers the lowest GI, followed closely by rolled oats; instant oatmeal tends to have a higher GI due to processing․

Enjoy oats with berries, nuts, and seeds for an even lower glycemic load and added nutritional benefits․

Barley

Barley is a nutritious whole grain that boasts a remarkably low glycemic index, making it an excellent addition to a blood-sugar-friendly diet․ Its high fiber content, particularly beta-glucan, plays a crucial role in slowing down the absorption of glucose into the bloodstream, preventing spikes․

Compared to white rice or potatoes, barley offers a significantly gentler impact on blood sugar levels․ Pearl barley, the most common type, is still beneficial, though hulled barley retains more nutrients and fiber․

Incorporate barley into soups, stews, salads, or as a side dish for a satisfying and healthy meal․

Sweet Potatoes

Despite their sweetness, sweet potatoes generally exhibit a lower glycemic index compared to white potatoes, making them a preferable carbohydrate source for managing blood sugar․ This is largely due to their higher fiber content and complex carbohydrates․

However, the GI can vary based on cooking method; boiling or steaming preserves a lower GI than baking or frying․ Choosing vibrant orange-fleshed varieties often indicates a higher concentration of beneficial nutrients like beta-carotene․

Enjoy sweet potatoes as a side dish, in casseroles, or even as a healthier alternative to fries․ Portion control remains important, even with low GI foods;

Proteins & Fats – Minimal Impact on GI

Proteins and healthy fats have a negligible effect on blood glucose levels and, therefore, do not significantly impact the glycemic index․ This makes them essential components of a balanced diet, particularly for individuals managing diabetes or seeking stable energy․

Lean meats like chicken, turkey, and fish provide essential amino acids without raising blood sugar․ Legumes, such as beans and lentils, offer both protein and fiber, further contributing to satiety and blood sugar control․

Incorporating nuts, seeds, avocado, and olive oil provides healthy fats that promote overall well-being․ These foods can be freely enjoyed as part of a low GI eating plan․

Lean Meats (Chicken, Turkey, Fish)

Lean meats – chicken, turkey, and various types of fish – are excellent protein sources with virtually no impact on the glycemic index․ They don’t contain carbohydrates, meaning they won’t cause a rise in blood glucose levels after consumption․ This characteristic makes them a cornerstone of a low GI diet, suitable for managing diabetes or promoting stable energy․

Prioritizing lean cuts minimizes saturated fat intake, contributing to heart health․ These proteins promote satiety, helping to control appetite and overall calorie consumption․

They can be incorporated into numerous meals, offering versatility and nutritional benefits․ Enjoy grilled chicken, baked turkey, or steamed fish as part of a balanced, low GI meal plan․

Legumes (Beans, Lentils)

Legumes, encompassing beans and lentils, represent a nutritional powerhouse with a surprisingly low glycemic index․ Their complex carbohydrate structure and high fiber content contribute to a slow and steady release of glucose into the bloodstream, preventing spikes in blood sugar․ This makes them incredibly beneficial for individuals managing diabetes or seeking sustained energy levels․

Beyond their GI benefits, legumes are rich in protein, iron, and other essential nutrients․ They offer a plant-based protein alternative, supporting muscle health and overall well-being;

Incorporating legumes into your diet is both affordable and versatile, lending themselves to soups, stews, salads, and more․

Nuts & Seeds

Nuts and seeds are nutritional powerhouses boasting a remarkably low glycemic index, making them excellent additions to a blood-sugar-friendly diet․ Their combination of healthy fats, protein, and fiber slows down carbohydrate absorption, preventing rapid glucose spikes․ This characteristic is crucial for maintaining stable energy levels and supporting metabolic health․

From almonds and walnuts to chia seeds and flaxseeds, the variety is vast, offering diverse flavors and textures․ They provide essential fatty acids, vitamins, and minerals, contributing to heart health and overall well-being․

Enjoy them as snacks, sprinkled on salads, or incorporated into meals for a satisfying and nutritious boost․

Healthy Fats (Avocado, Olive Oil)

Healthy fats, such as those found in avocados and olive oil, have a minimal impact on the glycemic index, making them valuable components of a balanced diet․ Unlike carbohydrates, fats do not directly raise blood glucose levels, contributing to stable energy and improved insulin sensitivity․

Avocados, rich in monounsaturated fats and fiber, offer a creamy texture and versatile culinary applications․ Olive oil, a cornerstone of the Mediterranean diet, provides heart-healthy fats and antioxidants․

Incorporating these fats into meals can enhance satiety, support nutrient absorption, and promote overall health․ They are essential for hormone production and cellular function, contributing to long-term well-being․

Resources for Further Information

Explore detailed glycemic index and load values via international tables and the Linus Pauling Institute․ Access comprehensive data for informed dietary choices․

International Tables of Glycemic Index and Glycemic Load Values

Extensive databases cataloging the glycemic impact of numerous foods are readily available for public access․ These tables, such as those published in 2008 via PMC, contain entries for over 2,487 foods, meticulously compiled from 205 separate studies․

Common staples like white bread, cornflakes, various rice types, oranges, corn, apple juice, sucrose, and milk are included in these analyses․ Researchers utilize a standardized methodology, comparing the effect of 50 grams of carbohydrate from a test food against a control food (typically white bread or glucose)․

These resources, often accessible online via DOI links (e․g․, http://dx․doi․org/10․2337/dc08-1239), provide invaluable data for individuals seeking to manage their blood sugar levels through dietary adjustments․

Linus Pauling Institute – Glycemic Index Information

The Linus Pauling Institute at Oregon State University offers a wealth of information regarding the glycemic index (GI) and its implications for health․ Their research clarifies that intermediate-GI foods fall within a range of 56 to 69, providing a crucial benchmark for dietary planning․

The Institute details the methodology used to determine GI values, involving controlled studies with human volunteers․ Participants consume 50 grams of carbohydrate from a test food and a control food (white bread or glucose) on separate occasions․

This comparative analysis allows for accurate GI assignment, aiding individuals in making informed food choices to manage blood glucose levels effectively․ Their resources are invaluable for understanding the nuances of carbohydrate metabolism and its impact on overall well-being․

ingersoll rand air compressor troubleshooting guide pdf

Ingersoll Rand Air Compressor Troubleshooting Guide PDF: An Overview

Ingersoll Rand excels in metal removal technology, offering cutting tools and solutions for diverse industries; their PDF guides aid in maintaining optimal compressor performance․

Understanding Your Compressor Model

Before diving into troubleshooting, identifying your specific Ingersoll Rand air compressor model is crucial․ Different models possess unique components and operational characteristics․ Locate the model number – typically found on a nameplate affixed to the compressor tank or housing․ This number is essential when accessing the correct PDF manual and parts diagrams․

Ingersoll Rand offers a vast range of compressors, from portable units to large industrial systems․ Knowing whether you have a single-stage, two-stage, oil-lubricated, or oil-free compressor dictates the appropriate troubleshooting steps․ The official PDF manual, tailored to your model, will detail specific maintenance schedules, component locations, and safety precautions․ Accurate model identification ensures effective and safe repairs․

Locating the Official PDF Manual

Accessing the official Ingersoll Rand PDF manual is paramount for effective troubleshooting and maintenance․ Begin your search on the Ingersoll Rand Support Website․ Utilize the search function, entering your compressor’s specific model number․ The website provides a comprehensive library of documentation, including operator manuals, parts lists, and maintenance guides․

Alternatively, a general web search using the model number and “PDF manual” can yield results․ Ingersoll Rand catalogs are available in both PDF and interactive flip-book formats, offering convenient access to information․ Ensure the manual downloaded corresponds precisely to your compressor model to avoid incorrect procedures․ Having the correct PDF ensures safe and accurate repairs․

Common Ingersoll Rand Air Compressor Problems

Frequent issues include low air pressure, compressors failing to start, and overheating; proper diagnosis, aided by manuals, is crucial for effective repair․

Low Air Pressure Issues

Experiencing insufficient air pressure is a common concern with Ingersoll Rand compressors․ This can stem from several sources, demanding a systematic troubleshooting approach․ Firstly, verify adequate tank pressure – a failing pressure switch or slow compressor recovery can be culprits․ Secondly, meticulously inspect all air connections for leaks; even small leaks significantly reduce output․

Consider the air filter; a clogged filter restricts airflow, lowering pressure․ Check the check valve, ensuring it’s sealing correctly to prevent air from flowing back into the compressor․ Finally, confirm the compressor’s motor is functioning optimally, as a weak motor struggles to maintain pressure․ Referencing the official PDF manual is vital for model-specific guidance and diagrams․

Insufficient Tank Pressure

Insufficient tank pressure indicates the compressor isn’t building or holding air effectively․ Begin by checking the pressure switch; a faulty switch may not be calling for the motor to run, or shutting it off prematurely․ Inspect the compressor’s unloader valve – if stuck in the ‘unload’ position, it prevents tank pressurization․

A failing compressor pump, due to worn rings or valves, can also cause this issue․ Verify the motor is receiving adequate power and isn’t overloaded․ Listen for unusual noises during operation, which could signal internal component failure․ Consult the Ingersoll Rand PDF manual for specific pressure settings and diagnostic procedures for your model․

Leaking Air Connections

Air leaks significantly reduce compressor efficiency and pressure output․ Start by visually inspecting all air hoses, fittings, and connections for cracks or looseness․ Apply a soapy water solution to connections; bubbles indicate a leak․ Tighten loose fittings, but avoid over-tightening, which can damage threads․

Check the drain valve – a common leak point – and ensure it’s fully closed․ Inspect the air filter housing and connections for any breaches․ Replace damaged hoses or fittings immediately․ Refer to the Ingersoll Rand troubleshooting PDF for diagrams illustrating connection points and recommended torque specifications to ensure a secure seal․

Compressor Won’t Start

When your Ingersoll Rand compressor fails to start, systematically check potential causes․ First, verify a stable electrical supply – check the breaker, power cord, and outlet․ Confirm the power switch is in the ‘on’ position․ Next, investigate the pressure switch; a malfunctioning switch won’t signal the motor to run․

Consult the official PDF manual for specific pressure switch testing procedures․ Inspect the motor overload protector, which may have tripped due to overheating․ Allow it to cool and reset if necessary․ Referencing the troubleshooting guide’s wiring diagrams can help identify electrical faults․

Electrical Supply Problems

If your Ingersoll Rand compressor isn’t starting, begin with a thorough electrical check․ Ensure the power cord is securely plugged into a functioning outlet and isn’t damaged․ Verify the circuit breaker hasn’t tripped; reset it if necessary․ Test the outlet with another device to confirm it’s providing power․

Inspect the compressor’s wiring for loose connections or frayed wires – consult the PDF manual’s wiring diagrams․ A faulty power switch can also prevent startup; test its continuity․ Low voltage can also be a culprit, especially with larger compressors․ Always disconnect power before inspecting electrical components․

Pressure Switch Malfunctions

A malfunctioning pressure switch is a common reason an Ingersoll Rand compressor won’t start or runs erratically․ The switch regulates air pressure by turning the motor on and off․ Check the switch’s adjustment settings against the specifications in your compressor’s PDF manual․

Use a multimeter to test the switch’s continuity; it should open and close at the correct pressure points․ A dirty or corroded switch can also cause issues; try cleaning the contacts carefully․ If the switch is damaged or fails the continuity test, it needs replacement․ Always disconnect power before working on the pressure switch․

Overheating Problems

Consistent overheating can severely damage your Ingersoll Rand air compressor․ Insufficient ventilation is a primary cause; ensure the compressor has ample space around it for airflow, free from obstructions․ Check the cooling fan to confirm it’s operating correctly and isn’t blocked by debris․

Low oil levels also contribute to overheating due to increased friction․ Regularly check the oil level using the dipstick and top up as needed, following the guidelines in your compressor’s PDF manual․ Inspect the oil for contamination; dirty oil reduces its cooling properties․ Allow the compressor to cool completely before checking oil levels․

Inadequate Ventilation

Proper ventilation is crucial for dissipating heat generated during compressor operation․ Restricting airflow causes heat to build up, leading to overheating and potential damage․ Ensure the compressor isn’t enclosed in a small, confined space․ Maintain a minimum clearance of 18 inches around all sides of the unit for optimal airflow․

Dust and debris accumulation can further impede ventilation․ Regularly clean the compressor’s exterior, paying close attention to the cooling fins․ Avoid placing the compressor near heat sources or in direct sunlight․ Confirm the fan is unobstructed and functioning correctly, as it’s vital for drawing air across the cooling system․

Oil Level Issues

Maintaining the correct oil level is paramount for Ingersoll Rand compressor longevity․ Low oil levels lead to increased friction, causing premature wear and potential seizure of internal components․ Conversely, overfilling can create excessive pressure and foaming, reducing lubrication effectiveness․

Regularly check the oil level using the dipstick, ensuring it falls within the designated range․ Use only the oil type recommended by Ingersoll Rand, as specified in your compressor’s manual․ Inspect for oil leaks around seals and connections, addressing any issues promptly․ Consistent oil changes, as per the maintenance schedule, are vital for optimal performance and preventing overheating․

Troubleshooting Specific Components

Detailed PDF guides from Ingersoll Rand pinpoint issues within key components like pressure switches, check valves, and motors for efficient repair․

Pressure Switch Troubleshooting

The pressure switch is crucial for regulating compressor operation, and troubleshooting it often involves checking for electrical continuity with a multimeter, as detailed in Ingersoll Rand’s PDF manuals․ A faulty switch can prevent the compressor from starting or cause it to run continuously․ Inspect the switch’s diaphragm for tears or damage, and verify that the air passages are clear of obstructions․

Adjusting the pressure switch requires careful attention to the desired cut-in and cut-out pressures, referencing the specific model’s instructions within the PDF․ Incorrect settings can lead to insufficient tank pressure or excessive wear․ Always disconnect power before working on the switch, and consult the diagrams provided in the official documentation for proper wiring configurations․ Proper diagnosis, guided by the PDF, ensures safe and effective repair․

Air Filter Maintenance & Issues

Ingersoll Rand’s PDF guides emphasize regular air filter maintenance as vital for compressor longevity and performance․ A clogged filter restricts airflow, reducing efficiency and potentially causing overheating․ Inspect the filter frequently – daily in dusty environments – for dirt and debris․ Cleaning procedures vary by filter type; some are washable, while others require replacement, as detailed in the manuals․

Common issues include a damaged filter housing or improper sealing, leading to unfiltered air entering the system․ This can contaminate the oil and damage internal components․ The PDF diagrams illustrate correct filter installation and sealing techniques․ Ignoring air filter maintenance can lead to costly repairs, so adhering to the recommended schedule outlined in the documentation is crucial for optimal operation․

Check Valve Problems & Solutions

Ingersoll Rand compressor PDF manuals detail the importance of a functioning check valve, preventing backflow from the tank to the pump when the compressor is off․ Common issues include a stuck or dirty valve, leading to pressure loss and the compressor repeatedly cycling․ Troubleshooting involves inspecting the valve for debris or corrosion, often requiring disassembly as shown in the diagrams․

Solutions range from cleaning the valve with solvent to complete replacement․ A faulty check valve can strain the motor and reduce overall system efficiency․ The guides emphasize using genuine Ingersoll Rand replacement parts to ensure compatibility and performance․ Regular inspection, as part of preventative maintenance, can identify potential problems before they escalate into major repairs, saving time and expense․

Motor Troubleshooting

Ingersoll Rand compressor PDF guides dedicate significant sections to motor diagnostics․ Common motor issues include capacitor failure, causing the motor to hum but not start, and overload protection tripping due to overheating or excessive current draw․ The manuals provide detailed steps for testing the capacitor with a multimeter and resetting the overload switch․

Troubleshooting also covers checking for winding shorts or open circuits, requiring more advanced electrical testing․ The guides stress safety precautions when working with electrical components․ Replacement parts should always be genuine Ingersoll Rand to maintain warranty and performance․ Proper ventilation, as detailed in the maintenance sections, is crucial to prevent motor overheating and ensure longevity, extending the compressor’s operational life․

Capacitor Failure

Ingersoll Rand compressor troubleshooting PDFs frequently identify capacitor failure as a primary motor starting issue․ A failing capacitor often manifests as a humming sound from the motor without rotation․ The guides detail how to safely discharge the capacitor before testing with a multimeter to verify capacitance – a reading significantly outside the specified range indicates failure․

Replacement requires matching the original capacitor’s voltage and microfarad (µF) rating precisely․ Incorrect capacitance can damage the motor․ The manuals emphasize disconnecting power before any capacitor work and highlight the potential for a dangerous electrical shock․ Proper capacitor function is vital for providing the necessary starting torque to the motor, ensuring reliable compressor operation․

Motor Overload Protection

Ingersoll Rand compressor troubleshooting PDFs consistently address motor overload protection as a critical safety feature․ These guides explain that overload protectors, typically thermal or magnetic, interrupt power to prevent motor damage from overheating due to excessive current draw․ Repeated tripping suggests underlying issues like a failing capacitor, restricted airflow, or a jammed pump․

The manuals detail how to reset the overload protector after addressing the root cause․ Ignoring the underlying problem and repeatedly resetting the protector can lead to motor burnout․ Troubleshooting steps involve checking for obstructions, verifying proper voltage, and inspecting the motor windings for shorts․ Understanding this protection system is key to preventing costly repairs and ensuring compressor longevity․

Maintenance & Preventative Measures

Regular oil changes, air filter upkeep, and daily tank draining—as detailed in Ingersoll Rand’s PDFs—prolong compressor life and maintain peak efficiency․

Regular Oil Changes

Maintaining proper oil levels and scheduling regular oil changes are crucial for Ingersoll Rand air compressor longevity․ Refer to your specific model’s PDF manual for recommended oil types and change intervals․ Oil lubricates vital components, reducing friction and wear, preventing overheating, and ensuring efficient operation․ Neglecting oil changes leads to increased friction, potential component failure, and reduced compressor performance․

Contaminated or degraded oil loses its lubricating properties, accelerating wear on pistons, cylinders, and bearings․ The PDF guides often detail specific procedures for oil draining and refilling, emphasizing the importance of using the correct oil viscosity and capacity․ Consistent oil maintenance, as outlined in the documentation, is a cornerstone of preventative maintenance․

Air Filter Cleaning/Replacement

Ingersoll Rand air compressor performance heavily relies on a clean air intake․ The PDF troubleshooting guides emphasize regular air filter maintenance – either cleaning or replacement – to prevent contaminants from entering the compressor․ Dirty filters restrict airflow, causing the motor to work harder, reducing efficiency, and potentially leading to overheating․

The frequency of cleaning or replacement depends on the operating environment; dusty conditions require more frequent attention․ The manuals detail the filter location and recommended cleaning procedures (if applicable) or specify the correct replacement filter part number․ Ignoring air filter maintenance can significantly shorten the compressor’s lifespan and void warranty coverage, as outlined in the documentation․

Drain Tank Moisture Daily

Ingersoll Rand compressor PDF manuals consistently highlight the critical importance of daily tank draining․ As air is compressed, moisture accumulates within the tank․ If left unchecked, this moisture can lead to corrosion, reducing tank capacity and potentially causing internal damage․ Furthermore, water in the air line can negatively impact tools and applications relying on clean, dry air․

The guides illustrate the location of the drain valve and provide clear instructions for proper operation․ Regularly draining the tank ensures optimal compressor performance, extends its lifespan, and prevents costly repairs․ Neglecting this simple maintenance task can compromise air quality and lead to significant operational issues, as detailed within the troubleshooting resources․

Resources & Further Help

Ingersoll Rand’s support website offers extensive resources, including parts diagrams in PDF format, and a dedicated Customer Support Team for assistance․

Ingersoll Rand Support Website

Ingersoll Rand’s official website is a crucial resource for air compressor owners seeking troubleshooting assistance and detailed information․ The site provides access to a comprehensive library of documentation, including downloadable PDF manuals specific to various compressor models․ Users can navigate through product catalogs, viewing both PDF and interactive flip-book versions for easy browsing of tooling solutions․

Furthermore, the website facilitates direct contact with their Customer Support Team, enabling users to address questions regarding order processing, delivery timelines, or pricing inquiries․ This direct line of communication ensures prompt assistance and personalized support, streamlining the troubleshooting process and maximizing compressor uptime․ The website is designed to be a central hub for all Ingersoll Rand product-related needs․

Finding Parts Diagrams (PDF)

Ingersoll Rand understands the importance of readily available parts information for effective compressor maintenance and repair․ Their website hosts an extensive collection of parts diagrams in PDF format, categorized by compressor model․ These diagrams are invaluable for identifying specific components, understanding assembly configurations, and ensuring accurate parts ordering․

Accessing these diagrams simplifies the troubleshooting process, allowing technicians and owners to visualize the internal workings of their compressors․ The detailed illustrations aid in pinpointing faulty parts and facilitate efficient repairs, minimizing downtime․ Combined with the comprehensive product catalogs available in both PDF and flip-book formats, locating the correct replacement parts becomes significantly easier, supporting long-term compressor reliability․

2024 rolex 24 spotters guide

2024 Rolex 24 Spotters Guide: A Comprehensive Plan

This comprehensive plan details the 2024 Rolex 24 at Daytona, offering a detailed spotter guide with 111 car illustrations, crucial for navigating the event effectively.

The 18th edition guide, released by IMSA, is an unmatched resource, alongside entry lists from Hankook 24H DUBAI 2024 and 24 Heures Du Mans 2023.

Key details include a 3.56-mile circuit length, and a breakdown of entries: 10 GTP, 13 LMP2, 13 GTD PRO, and 23 GTD cars competing for victory.

The 2024 Rolex 24 at Daytona marks another thrilling chapter in endurance racing history, a cornerstone event within the IMSA WeatherTech SportsCar Championship. This prestigious race, held annually at the iconic Daytona International Speedway, draws competitors and fans from across the globe.

Preparation is key for both participants and spectators, and the official IMSA Spotter Guide, now in its 18th edition, is an invaluable tool. Released recently, it boasts 111 detailed car illustrations, aiding in quick identification during the intense 24-hour competition.

Beyond the guide, understanding the diverse field – encompassing GTP, LMP2, GTD Pro, and GTD classes – is crucial. The event builds upon the momentum from races like the Hankook 24H DUBAI, where drivers like Darren Law are preparing for the challenge. This introduction sets the stage for a comprehensive exploration of the 2024 race.

Understanding the IMSA WeatherTech SportsCar Championship

The IMSA WeatherTech SportsCar Championship is North America’s premier sports car racing series, and the Rolex 24 at Daytona serves as its season opener. It’s a multifaceted championship, featuring multiple classes of vehicles – GTP, LMP2, GTD Pro, and GTD – each with unique regulations and performance characteristics.

Successfully navigating the Rolex 24 requires a grasp of these class distinctions, as highlighted in the official Spotter Guide. The guide’s 111 car illustrations are essential for differentiating between the competing machines. Understanding the championship’s structure allows fans to appreciate the strategic complexities at play.

The series attracts top manufacturers and drivers, fostering intense competition. Events like the Hankook 24H DUBAI often serve as preparation for IMSA competitors, like Darren Law, honing their skills for Daytona; The championship’s popularity is reflected in extensive coverage and readily available resources, including detailed entry lists and results.

Key Dates and Times for the 2024 Race

The 2024 Rolex 24 at Daytona commenced with qualifying sessions leading up to the main event. While specific times weren’t explicitly provided in the source material, the race itself is, as the name suggests, a 24-hour endurance challenge. The event’s importance is underscored by the release of the official IMSA Spotter Guide, a crucial resource for fans and media.

Preparation for Daytona often includes participation in preceding events like the Hankook 24H DUBAI, offering drivers valuable track time. The 2026 edition already has a spotters guide in development, demonstrating the ongoing planning process.

Staying updated with the latest schedule requires consulting the official IMSA website and social media channels. The release of the 18th edition Spotter Guide, with its 111 car illustrations, signifies the proximity of the race and the availability of essential information for following the action.

Race Format and Duration Explained

The Rolex 24 at Daytona is a true endurance race, demanding consistent performance from both drivers and machines over a grueling 24-hour period. Teams strategically rotate drivers to maintain pace and minimize errors, making pit stop execution and strategy paramount to success.

The race features multiple classes – GTP, LMP2, GTD Pro, and GTD – competing simultaneously, adding a layer of complexity to track positioning and overtaking maneuvers. The official IMSA Spotter Guide is invaluable for differentiating cars by class and livery.

Success isn’t solely about speed; reliability, fuel efficiency, and adherence to race rules are equally critical. The Classic 24 groups and classes for 2025 are still “coming soon”, but the 2024 format remains a test of endurance and strategic brilliance, requiring meticulous planning and flawless execution from all involved.

The Daytona International Speedway Circuit Layout

Daytona International Speedway presents a unique challenge with its 3.56-mile road course, a blend of high-speed banking and technical sections. Mastering the track is crucial for success in the Rolex 24, demanding precision and adaptability from drivers.

The circuit’s layout features significant banking in the tri-oval and turns one and two, allowing for incredibly high speeds, while the infield section demands precise braking and cornering. Understanding the racing line and optimal braking points is vital for competitive lap times.

The Spotter Guide highlights key corners and track characteristics, aiding in car identification and predicting driver behavior. Efficient navigation of pit road and awareness of garage locations are also essential for teams executing quick and effective pit stops throughout the 24-hour race.

Track Length and Key Corners

Daytona International Speedway’s road course spans 3.56 miles, presenting a demanding challenge for competitors. The track’s defining feature is its high-speed banking, particularly in the tri-oval, enabling sustained speeds exceeding 200 mph. This banking significantly impacts aerodynamic setups and driver confidence.

Key corners include the infamous Turn 1, a high-speed right-hander entering the tri-oval, and the challenging infield section, demanding precise braking and cornering skills. The Kink, a quick left-right sequence, tests driver reflexes and car balance. Mastering these corners is paramount for achieving fast lap times.

The Spotter Guide emphasizes these critical areas, assisting spotters in anticipating car movements and identifying potential overtaking opportunities. Understanding the track’s nuances is crucial for both drivers and those observing the race unfold.

Pit Road and Garage Locations

Pit road at Daytona International Speedway runs along the inside of the backstretch and the front straightaway, offering limited space for the large 2024 Rolex 24 entry field. Strategically positioned pit boxes are crucial for minimizing service times during the race’s frequent pit stops.

Garage locations are situated within the infield, organized by class to facilitate team logistics and preparation. GTP teams generally occupy prime garage space due to their complex machinery and larger support crews. LMP2, GTD Pro, and GTD teams are allocated garages based on entry numbers and series regulations.

The Spotter Guide provides a detailed map illustrating pit box assignments and garage locations, aiding in tracking team movements. Efficient pit stops and quick access to the garage are vital components of a successful race strategy.

2024 Entry List Overview

The 2024 Rolex 24 at Daytona boasts a diverse and competitive entry list, featuring a total of 60 cars spread across four classes: GTP, LMP2, GTD Pro, and GTD. The GTP class leads with 10 entries, showcasing the latest in prototype technology from manufacturers like Porsche, Cadillac, and BMW.

LMP2 presents 13 entries, offering a platform for experienced endurance racers and rising stars. The GTD Pro class mirrors this with 13 entries, featuring professional drivers battling in GT machinery. Finally, the GTD class is the largest, with 23 entries representing a wide range of manufacturers and teams.

Detailed entry lists are available through IMSA and race publications, including the official Spotter Guide, providing car numbers, driver lineups, and team information for comprehensive race coverage.

GTP Class: Cars and Teams to Watch

The GTP class at the 2024 Rolex 24 at Daytona is poised for intense competition, with ten entries representing cutting-edge hybrid technology. Porsche Penske Motorsport, with their 718 GT4 RS CS, is a strong contender, alongside Cadillac Racing and their V-Series.R prototype.

BMW M Team RLL also enters the fray, showcasing their innovative M Hybrid V8. Expect fierce battles between these manufacturers, pushing the boundaries of performance and efficiency. Wayne Taylor Racing with Andretti, fielding an Acura ARX-06, is another team to watch closely.

The Spotter Guide highlights these key players, providing detailed liveries and car numbers for easy identification during the 24-hour endurance race. Strategy and reliability will be crucial for success in this highly competitive class.

LMP2 Class: Competitors and Predictions

The LMP2 class at the 2024 Rolex 24 features thirteen entries, promising a thrilling battle amongst seasoned competitors. This class often showcases close racing and strategic pit stop battles, making it a fan favorite. Several teams are expected to contend for the top spot, including established names and ambitious newcomers.

The official Spotter Guide details each LMP2 entry, providing crucial information on liveries and car numbers for easy tracking throughout the 24 hours. Expect strong performances from teams with experienced endurance drivers and well-prepared machinery.

Reliability will be paramount in this demanding class, as mechanical issues can quickly derail a promising race. Predicting a clear winner is challenging, but consistent pace and flawless execution will be key to success.

GTD Pro Class: Key Contenders

The GTD Pro class at the 2024 Rolex 24 boasts a highly competitive field of thirteen entries, featuring professional drivers and cutting-edge GT3 machinery. This class is renowned for its intense battles and strategic depth, making it a highlight of the race weekend. Several teams stand out as key contenders for victory.

Iron Lynx, with their Lamborghini Huracan GT3 EVO2, and Heart of Racing Team, fielding an Aston Martin Vantage GT3 EVO, are expected to be at the forefront. The official Spotter Guide will be essential for identifying these cars amidst the action.

CarBahn Motorsports, with a Porsche 718 GT4 RS CS, and JMF Motorsports, also with a Porsche, are strong contenders. Success in GTD Pro demands precision, consistency, and a well-executed strategy throughout the grueling 24 hours.

GTD Class: A Detailed Look at the Field

The GTD class at the 2024 Rolex 24 presents a massive and diverse field of twenty-three entries, promising thrilling competition and unpredictable outcomes. This class is known for its blend of seasoned professionals and ambitious amateur drivers, creating a dynamic racing environment.

Notable contenders include BGB Motorsports, running a Mercedes AMG GT GT4, and CarBahn Motorsports, also with a Porsche 718 GT4 RS CS piloted by Uretsky. The official Spotter Guide will prove invaluable in distinguishing these cars during the race.

JMF Motorsports, fielding another Porsche 718 GT4 RS CS, is also expected to be competitive. Success in GTD requires not only speed but also strategic tire management and flawless pit stops, crucial for navigating the 24-hour endurance challenge.

Car Identification: Liveries and Numbers

Accurate car identification is paramount for following the 2024 Rolex 24 at Daytona, and the official IMSA Spotter Guide is the definitive resource. Understanding the numbering system, categorized by class, is the first step to becoming a proficient spotter.

The guide features 111 car illustrations, aiding in quick visual recognition. Beyond numbers, liveries play a significant role; Iron Lynx showcases a Lamborghini Huracan GT3 EVO2, while Heart of Racing Team sports an Aston Martin Vantage GT3 EVO.

Andy Blackmoredesign contributes to the striking visual landscape of the race. Paying attention to these details, combined with the class-specific numbering, will allow fans to confidently track their favorite teams and drivers throughout the grueling 24-hour event.

Decoding Car Numbers by Class

Understanding the car number system is crucial for any Rolex 24 at Daytona spectator. The IMSA WeatherTech SportsCar Championship utilizes a class-based numbering scheme, allowing for quick identification of each vehicle’s competitive category.

The official 2024 Spotter Guide, now in its 18th edition, meticulously details this system. GTP cars will have numbers within a specific range, distinct from the LMP2, GTD Pro, and GTD classes.

This clear demarcation, coupled with the 111 car illustrations provided in the guide, enables fans to instantly categorize each entry. Knowing whether a car is a high-downforce GTP prototype or a GTD-class production-based machine significantly enhances the viewing experience and understanding of on-track battles.

Notable Liveries for 2024

The 2024 Rolex 24 at Daytona promises a visually stunning spectacle, with several teams unveiling striking new liveries. The official IMSA Spotter Guide, featuring 111 car illustrations, is essential for recognizing these designs amidst the 24-hour race.

Iron Lynx showcases a vibrant Lamborghini Huracan GT3 EVO2 design, while Heart of Racing Team presents an Aston Martin Vantage GT3 EVO with a bold aesthetic. JMF Motorsports’ Porsche 718 GT4 RS CS and BGB Motorsports’ Mercedes AMG GT GT4 also sport eye-catching color schemes.

CarBahn Motorsports’ Porsche features the number 44 Uretsky livery. These distinctive paint jobs not only enhance the cars’ appearance but also aid in quick identification for spectators and spotters throughout the intense competition at Daytona.

Driver Lineup Highlights

The 2024 Rolex 24 at Daytona boasts an exceptional driver roster, blending seasoned veterans with rising stars. Notably, Darren Law, a previous Daytona 24 Hours winner, returns to competition with Putman and Espenlaub in the Hankook 24H DUBAI, marking his first race since 2019.

This event serves as crucial preparation for Daytona, showcasing the collaborative spirit and experience vital for endurance racing success. The IMSA Spotter Guide, with its detailed car and driver information, will be invaluable for tracking these key competitors.

Expect intense battles and strategic driver pairings as teams navigate the demanding 24-hour format. The diverse range of talent ensures a thrilling contest, making driver performance a critical factor in determining the ultimate victor at Daytona.

Team Strategies and Pit Stop Dynamics

Successful navigation of the Rolex 24 at Daytona hinges on meticulously planned team strategies and flawlessly executed pit stops. Teams must balance aggressive driving with fuel conservation and tire management across the grueling 24-hour duration.

Pit stop efficiency is paramount, with minimal downtime crucial for maintaining track position. The Spotter Guide aids in identifying cars entering and exiting pit lane, allowing observers to analyze team performance.

Strategic decisions regarding driver changes, tire compounds, and fuel loads will be continuously adjusted based on race conditions and competitor actions. Understanding these dynamics is key to appreciating the complex chess match unfolding throughout the race, ultimately determining the winning strategy.

Race Control and Safety Car Procedures

Effective race management by IMSA officials is vital for ensuring a safe and competitive Rolex 24 at Daytona. Race Control closely monitors on-track activity, deploying the safety car to neutralize incidents and allow for track clearance.

Understanding safety car procedures is crucial for spotters and fans alike. The field is typically bunched behind the safety car, with passing prohibited until the green flag is displayed. Pit stops often occur during safety car periods, adding a strategic layer to the race.

The Spotter Guide doesn’t detail these procedures directly, but awareness of their impact on race dynamics is essential. Decisions made by Race Control significantly influence the race outcome, impacting team strategies and driver positioning throughout the 24 hours.

Weather Considerations and Impact on Racing

Florida’s unpredictable weather plays a significant role in the Rolex 24 at Daytona. Conditions can shift rapidly, from clear skies to heavy rain, impacting tire choice, aerodynamic setups, and overall race strategy.

Rain introduces the possibility of full-course cautions and requires teams to quickly adapt to wet-weather tires and reduced visibility. The Spotter Guide itself doesn’t forecast weather, but staying informed about the forecast is paramount for accurate race observation.

Temperature fluctuations also affect tire performance and engine cooling. Teams must carefully monitor these factors to optimize their cars for changing conditions. A well-prepared team anticipates weather changes and adjusts its strategy accordingly, potentially gaining a crucial advantage during the 24-hour endurance test.

Fan Guide: Access, Amenities, and Viewing Spots

Daytona International Speedway offers diverse viewing experiences for the Rolex 24. Access options range from general admission to premium hospitality suites, each providing a unique perspective on the race.

The fan guide details venue information, including gate locations, parking arrangements, and accessibility services. Amenities include concessions, merchandise shops, and interactive displays, enhancing the overall race-day experience.

Prime viewing spots include the grandstands overlooking the tri-oval and turns, as well as the horseshoe area offering views of pit road. Exploring the infield allows closer proximity to team garages, but requires appropriate credentials. Utilizing the Spotter Guide alongside the fan guide helps identify car locations and team strategies while enjoying the event.

Official Spotter Guide Resources (IMSA)

IMSA is the primary source for the official Rolex 24 at Daytona Spotter Guide. The 18th edition, released for the 2024 race, is an invaluable tool for identifying competitors and understanding the complex field.

This guide features detailed illustrations of all 69 entries – 10 GTP, 13 LMP2, 13 GTD PRO, and 23 GTD – showcasing liveries and car numbers. It’s a crucial resource for media, team personnel, and dedicated fans tracking the race.

Access to the digital Spotter Guide is typically available on the IMSA website prior to the event. Resources also include entry lists from related events like the Hankook 24H DUBAI and 24 Heures Du Mans, providing context and competitor background. Regularly checking IMSA’s official channels ensures access to the latest updates and revisions.

Where to Find Live Timing and Scoring

Live timing and scoring for the 2024 Rolex 24 at Daytona will be readily available through the official IMSA website (imsa.com). This platform provides real-time updates on lap times, positions, and sector splits for all competing cars.

Several motorsport-specific websites and apps, such as Race-Monitor, also integrate IMSA’s timing data, offering customizable views and alerts. These platforms allow fans to track their favorite teams and drivers throughout the 24-hour endurance race.

Additionally, many television and streaming broadcasts of the race will display live timing graphics. Social media channels, particularly IMSA’s official accounts, will share key timing updates and significant on-track events. Utilizing multiple sources ensures comprehensive coverage and a dynamic race-viewing experience.

Social Media Channels for Race Updates

Staying connected during the 2024 Rolex 24 at Daytona is easy through various social media platforms. IMSA’s official accounts – typically found on X (formerly Twitter), Facebook, Instagram, and YouTube – are primary sources for real-time updates.

These channels deliver race highlights, incident reports, driver interviews, and behind-the-scenes content. Team accounts also provide valuable insights, sharing perspectives from the garage and track. Hashtags like #Rolex24, #IMSA, and #Daytona24 facilitate easy tracking of race-related conversations.

Dedicated motorsport news outlets and fan communities actively share updates and analysis. Engaging with these channels offers a dynamic and interactive race experience, supplementing live broadcasts and timing information. Following key personnel and drivers can also provide unique perspectives throughout the event.

Post-Race Analysis and Results

Following the checkered flag at the 2024 Rolex 24 at Daytona, comprehensive results and detailed analysis become readily available. Official results are published on the IMSA website, detailing finishing positions for each class (GTP, LMP2, GTD Pro, and GTD), along with lap counts and notable incidents.

Motorsport news outlets provide in-depth race reports, examining key strategies, pivotal moments, and driver performances. Post-race interviews offer insights from winning teams and competitors, revealing the challenges and triumphs of the endurance event.

Statistical breakdowns, including fastest laps and total distance covered, offer a quantitative assessment of the race. Analyzing these results helps understand the factors contributing to success and provides context for future events within the IMSA WeatherTech SportsCar Championship.

clicker garage door keypad manual

Clicker Garage Door Keypad Manual: A Comprehensive Guide

Today’s date is 03/08/2026 16:25:16. This manual provides detailed instructions for programming, operating, and maintaining your Clicker garage door keypad, enhancing security and convenience.

Understanding Clicker Keypad Systems

Clicker keypad systems represent a convenient and secure method for controlling garage door access, offering an alternative to traditional remote controls. These systems utilize a numerical keypad, allowing authorized users to input a pre-programmed PIN code to operate the garage door. The core function revolves around transmitting a signal to the garage door opener upon correct code entry.

Modern Clicker keypads often incorporate rolling code technology, significantly enhancing security by changing the access code each time the keypad is used. This prevents replay attacks, where intercepted signals are used to gain unauthorized access. Furthermore, many models feature lockout mechanisms after multiple incorrect attempts, bolstering protection against brute-force code cracking. Understanding these fundamental principles is crucial for effective system utilization and maintenance. Testing click speed, while seemingly unrelated, can indirectly improve reaction time for quick code entry.

Keypad Components and Identification

A typical Clicker garage door keypad consists of several key components. The numeric keypad itself is the primary interface for entering your access code. An LCD screen, present on some models, displays prompts and confirms actions. A power source, usually batteries, provides the necessary energy for operation. A protective housing shields the internal components from the elements.

Identifying these parts is essential for battery replacement and troubleshooting. Look for a reset button, often recessed to prevent accidental activation, used to restore factory settings. Indicator LED lights signal system status – successful entry, lockout, or low battery. Familiarize yourself with the location of the battery compartment and the wiring connections if hardwired. Understanding these components allows for confident maintenance and efficient problem-solving, even relating to quick reaction tests like a CPS test.

Types of Clicker Garage Door Keypads

Clicker offers several types of garage door keypads to suit different needs and opener models. Wireless keypads communicate via radio frequency, offering flexible installation without wiring. Wired keypads require a direct connection to the garage door opener, providing a secure and reliable link. Some keypads feature a backlit display for improved visibility in low-light conditions, aiding quick access, much like fast clicks in a reaction test.

Multi-code keypads can store multiple PINs, ideal for families or shared access. Rolling code keypads enhance security by changing the access code each time it’s used, preventing unauthorized entry. Newer models may integrate with smart home systems, allowing remote control via smartphone apps. Choosing the right keypad depends on your garage door opener’s compatibility, desired security level, and convenience preferences. Consider features like CPS testing for optimal responsiveness.

Initial Setup and Power Requirements

Before installing your Clicker keypad, ensure your garage door opener is compatible. Most keypads require a 9-volt battery for operation, though some wired models draw power directly from the opener. Carefully read the included instructions for specific wiring diagrams if applicable. Mounting the keypad near the garage door, within clear view but protected from the elements, is recommended.

During setup, locate the “learn” button on your garage door opener motor unit. This button initiates the pairing process with the keypad. The keypad typically enters a programming mode upon initial power-up, indicated by a flashing light. Ensure no obstructions interfere with the signal, similar to maintaining a clear target during a click speed test. Proper placement and power supply are crucial for reliable operation and security.

Programming Your Clicker Keypad

Programming involves setting a unique PIN code for secure access, often starting with factory defaults. Follow the step-by-step instructions carefully for successful keypad activation.

Default PIN Codes and Factory Settings

Most Clicker garage door keypads arrive with a pre-programmed default PIN code, typically ‘1234’ or ‘0000’. However, it’s crucial to understand that using this default code compromises your garage’s security. Immediately changing this code upon installation is highly recommended.

Factory settings also dictate the number of allowed incorrect entry attempts before the keypad locks for a specific duration – often 30 seconds. This lockout feature is a security measure to prevent brute-force attempts to guess the PIN. Resetting the keypad to its factory settings will erase all programmed codes, reverting it to the original default PIN and lockout parameters.

Consult your specific keypad model’s documentation to confirm the exact default PIN and lockout duration, as these can vary. Understanding these initial settings is the first step towards customizing your keypad for optimal security and convenience.

Programming a New PIN Code – Step-by-Step

To program a new PIN, begin by entering the existing PIN code (default is often 1234 or 0000) followed by the ‘#’ or ‘Enter’ button – consult your model’s guide. The keypad will typically indicate programming mode with a flashing light. Next, enter your desired four-digit PIN code. Re-enter the new PIN to confirm its accuracy.

A successful confirmation is usually signaled by a solid light or an audible beep. If an error occurs during entry, the keypad will revert to standby mode, and you’ll need to restart the process. Some models require pressing a ‘Learn’ or ‘Program’ button on the garage door opener itself during this sequence.

Always test the new PIN code immediately after programming to ensure it functions correctly. Remember to keep your new PIN confidential and avoid easily guessable combinations.

Clearing Existing PIN Codes

To clear existing PIN codes, you generally need to enter a specific sequence on the keypad. This often involves entering the current valid PIN, followed by a designated code for resetting – frequently ‘#’ then ‘0’ or a similar combination, but always refer to your specific model’s instructions. The keypad will usually confirm the reset with a visual or audible signal.

Clearing the codes effectively restores the keypad to its factory default settings, typically using a standard PIN like 1234 or 0000. After clearing, it’s crucial to immediately reprogram a new, secure PIN code to maintain access control.

Be aware that clearing all PINs will render previous codes unusable, potentially locking out authorized users until a new code is established. Document the reset process for future reference.

Troubleshooting Programming Issues

If programming fails, first ensure the keypad has fresh batteries and is within range of the garage door opener. Double-check the entered PIN code for accuracy; even a single incorrect digit can cause failure. If the opener isn’t responding, verify it’s not in vacation mode or locked.

Some keypads require a specific sequence – pressing the ‘Learn’ button on the opener within a limited timeframe after entering the code. If multiple attempts fail, try resetting the keypad to factory defaults (refer to the manual) and starting the programming process anew.

Interference from other wireless devices can sometimes disrupt the signal. Temporarily disable nearby devices to test. If problems persist, consult the manufacturer’s website or contact customer support for assistance.

Operating the Keypad

To operate, simply enter your programmed PIN code, followed by pressing the ‘Send’ or ‘Enter’ button, activating the garage door opener swiftly and securely.

Entering Your PIN Code Correctly

Accurate PIN code entry is crucial for successful keypad operation. Ensure you’re pressing each button firmly and deliberately. Pay close attention to the numerical sequence you previously programmed; even a single incorrect digit will prevent the door from opening. The keypad may feature indicator lights or audible beeps to confirm each button press, providing immediate feedback.

If the door doesn’t respond after entering your code, double-check for errors and re-enter it slowly. Avoid rushing the process, as this increases the likelihood of mistakes. Some keypads implement lockout features after multiple failed attempts, so patience is key. Remember that the keypad is designed for quick access, but security relies on precise input. Regularly test your code to ensure it functions correctly and to reinforce your memory of the sequence. Familiarize yourself with the keypad’s specific response signals for successful and unsuccessful entries.

Keypad Lockout Procedures

Most Clicker garage door keypads incorporate lockout procedures as a security measure against unauthorized access. Typically, after a series of consecutive incorrect PIN code attempts – often five to ten – the keypad will temporarily disable further input. This lockout period can range from several minutes to a longer duration, preventing brute-force guessing.

During a lockout, the keypad may display a specific indicator light pattern or remain unresponsive. To regain access, you’ll usually need to wait for the lockout period to expire. Some models offer a master override code or require reprogramming via the garage door opener’s internal programming button. Consult your specific model’s documentation for detailed lockout reset instructions. Understanding these procedures is vital to avoid being stranded and to maintain the security of your home. Always remember your programmed PIN!

Using the Keypad in Emergency Situations

In emergency situations where quick garage door access is crucial, understanding your keypad’s limitations is paramount. If the keypad is experiencing a malfunction, or during a power outage (unless a battery backup is present), the keypad may become inoperable. Familiarize yourself with alternative entry methods, such as using a garage door opener remote or the manual release mechanism located on the garage door itself.

Knowing the location and operation of the manual release is vital for situations where the electric opener is unavailable. Always exercise caution when using the manual release, as the door may be heavy and could cause injury if not handled correctly. Prioritize safety and ensure clear communication with anyone assisting during an emergency. Regularly test alternative access methods to confirm their functionality.

Understanding Keypad Indicator Lights

Your Clicker garage door keypad utilizes indicator lights to communicate its status and operational mode. A steadily lit light typically indicates the system is powered on and ready for input. A flashing light often signals that the keypad is in programming mode, awaiting PIN code entry or confirmation. The specific meaning of flashing patterns can vary between models; consult your specific model’s documentation for detailed interpretations.

If the light doesn’t illuminate, check the battery (if applicable) or power supply. A rapid flashing light might indicate an error, such as an incorrect PIN attempt exceeding the lockout threshold. Understanding these visual cues allows for quick troubleshooting and ensures efficient operation. Refer to the manufacturer’s guide for a comprehensive explanation of all indicator light functions for your specific keypad.

Maintenance and Troubleshooting

Regularly check battery levels and clean the keypad surface. Addressing common malfunctions promptly, like unresponsive buttons, ensures continued reliable operation and security.

Battery Replacement Procedures

Maintaining optimal keypad function requires periodic battery replacement. Typically, Clicker keypads utilize standard alkaline batteries, though specific types vary by model. Begin by locating the battery compartment, usually on the keypad’s rear panel, secured by a small screw or latch. Gently open the compartment and note the battery orientation before removal – this prevents incorrect installation.

Remove the old batteries and insert fresh ones, ensuring correct polarity (+ and -) as indicated within the compartment. Securely close the battery compartment cover. After replacement, the keypad may require reprogramming, depending on the model; consult the programming section of this manual. Low battery levels often manifest as delayed responses or intermittent operation. Proactive battery changes prevent unexpected lockouts and ensure consistent access. Always dispose of used batteries responsibly, following local regulations.

Addressing Common Keypad Malfunctions

Several issues can arise with your Clicker keypad. If the keypad fails to respond, first verify fresh batteries are installed correctly. A frozen keypad, unresponsive to inputs, often indicates low power or internal component failure. If the keypad repeatedly locks out, double-check the programmed PIN code and ensure it’s entered accurately and consistently. Interference from other wireless devices can sometimes cause erratic behavior; try relocating the keypad.

For unresponsive key buttons, gently clean the surface with a soft, dry cloth. If the keypad displays incorrect characters, a deeper internal issue may exist. If problems persist after these troubleshooting steps, consult the programming section to attempt a factory reset. If a reset doesn’t resolve the issue, professional repair or replacement may be necessary. Remember to always prioritize safety when troubleshooting electrical devices.

Cleaning and Protecting Your Keypad

Regular cleaning extends the life of your Clicker keypad. Dust, dirt, and moisture can interfere with button functionality and cause corrosion; Use a soft, dry cloth to wipe down the keypad surface weekly. Avoid abrasive cleaners or solvents, as these can damage the plastic casing and electronic components. For stubborn grime, lightly dampen the cloth with water, ensuring it’s wrung out thoroughly before wiping.

Protecting your keypad from the elements is crucial, especially in outdoor installations. Ensure the keypad is shielded from direct sunlight, rain, and snow. Consider a protective cover or enclosure to provide additional weather resistance. Avoid exposing the keypad to extreme temperatures. Regularly inspect the keypad for any signs of physical damage, such as cracks or loose buttons, and address them promptly to prevent further issues.

Resetting the Keypad to Factory Defaults

Resetting your Clicker keypad to factory defaults erases all programmed PIN codes, returning it to its original settings. This is useful if you’ve forgotten your PIN or are experiencing persistent programming issues. The reset procedure varies by model; consult your specific keypad’s documentation for precise instructions. Generally, it involves holding down a specific combination of buttons for a designated period – often the ‘Clear’ or ‘Delete’ button along with the ‘#’ key.

Before resetting, be aware that you’ll need to reprogram the keypad afterward. Confirm the reset was successful by attempting to enter a PIN code; it should fail. If the reset doesn’t work, double-check the button combination and timing, or contact Clicker customer support for assistance. A factory reset doesn’t affect your garage door opener itself, only the keypad’s access codes.

Advanced Features & Compatibility

Explore remote control integration, security best practices, and compatibility with various garage door openers. Click speed tests can also refine reaction times for keypad use.

Compatibility with Different Garage Door Opener Models

Clicker keypad systems are designed with broad compatibility in mind, but verifying support for your specific garage door opener model is crucial before installation. Most Clicker keypads utilize rolling code technology, enhancing security and allowing integration with a wide range of openers manufactured after 1993. However, older openers employing fixed-code systems may not be compatible.

To determine compatibility, consult your garage door opener’s manual or the manufacturer’s website. Look for mentions of rolling code compatibility or specific Clicker model numbers. Common brands supported include Chamberlain, LiftMaster, Craftsman, and Genie. If your opener is not listed, a compatibility check with Clicker’s support team is recommended. Ensure the keypad frequency matches your opener’s receiver frequency – typically 310MHz, 390MHz, or 315MHz. Incorrect frequency matching will prevent successful programming and operation. Proper compatibility ensures seamless integration and reliable access control.

Remote Control Integration with Keypad

Clicker keypad systems often work seamlessly alongside your existing garage door remote controls, offering flexible access options. Integrating the keypad doesn’t typically interfere with remote functionality; both can operate independently to open and close the garage door. However, programming the keypad might require clearing existing remote codes in some instances, depending on the opener model.

To integrate, program the keypad following the manufacturer’s instructions, then re-program your remote controls if necessary. This ensures both systems function correctly. Some advanced Clicker systems allow for centralized control, where the keypad can manage access for multiple remotes. This feature enhances security by enabling remote deactivation if a remote is lost or stolen. Regularly test both keypad and remote functionality to confirm continued compatibility and reliable operation, providing convenient and secure garage access.

Security Considerations and Best Practices

Maintaining the security of your Clicker garage door keypad is paramount. Avoid using easily guessable PIN codes like birthdays or addresses; opt for a random combination of numbers. Regularly change your PIN code, especially if you suspect unauthorized access or have recently experienced a security breach. Be mindful of shoulder surfing – ensure no one can observe you entering your code.

Consider the keypad’s visibility; a concealed location reduces the risk of code compromise. If your keypad offers lockout features after multiple incorrect attempts, enable them. Regularly inspect the keypad for physical tampering. Integrating the keypad with a monitored security system provides an extra layer of protection. Remember, a secure keypad contributes significantly to the overall safety of your home and belongings, deterring potential intruders and providing peace of mind.

Click Speed Tests and Reaction Time (Related to Keypad Use)

While seemingly unrelated, assessing your click speed and reaction time can indirectly highlight efficiency when using your Clicker keypad. Online tools like those found on clicker-test.com offer CPS (Clicks Per Second) tests – 1-second, 5-second, and 10-second variations – measuring how quickly you can register inputs. These tests, including the Spacebar Clicker Challenge and Kohi Click Test, aren’t about maximizing clicks on a mouse, but rather gauging your general responsiveness.

A faster reaction time translates to quicker, more confident PIN code entry on the keypad. Practicing these tests can subtly improve your dexterity and reduce hesitation. Though not a direct correlation, enhanced reflexes can minimize the time your garage door is vulnerable during keypad operation. Consider these tests a fun way to potentially optimize your interaction with the keypad, contributing to a smoother, more secure experience.

kindergarten readiness checklist pdf

Kindergarten Readiness Checklist: A Comprehensive Guide

Downloadable kindergarten readiness checklists, often in PDF format, are readily available online from resources like FamilyEducation and Covenant Home, aiding parents in evaluating crucial skills.

Preparing a child for kindergarten is a significant milestone, and utilizing a kindergarten readiness checklist PDF can be incredibly beneficial. These checklists, sourced from platforms like Student Resources and FamilyEducation, offer a structured approach to assess a child’s development across various domains.

They aren’t about academic prerequisites, but rather ensuring a child possesses the foundational social-emotional, early literacy, and self-help skills needed for a successful transition. A PDF format allows for easy printing and repeated use as you track progress. Resources like Covenant Home provide detailed assessments, covering 45 skills.

Ultimately, these checklists empower parents to proactively identify areas where their child may need additional support before embarking on their kindergarten journey, fostering confidence and a positive learning experience.

Why Use a Kindergarten Readiness Checklist?

A kindergarten readiness checklist PDF provides a clear, organized framework for evaluating a child’s preparedness, moving beyond simple assumptions. Resources like FamilyEducation highlight their value in tracking emotional, social, and academic development. Utilizing a PDF version allows for convenient printing and repeated assessments, monitoring growth over time.

These checklists, such as those offered by Covenant Home, pinpoint specific skills – encompassing gross motor skills to foundational literacy – enabling targeted support. They help identify strengths and areas needing attention before the kindergarten experience begins, potentially preventing frustration for both child and teacher.

Ultimately, a checklist fosters a calm, confident start to school, ensuring a smoother transition and maximizing a child’s potential for success.

I. Social-Emotional Development

PDF checklists assess vital social-emotional skills, like self-regulation and peer interaction, crucial for kindergarten success, as emphasized by various online resources.

Self-Regulation Skills

Kindergarten readiness checklists, frequently available as PDF downloads, heavily emphasize self-regulation. This encompasses a child’s ability to manage their emotions, control impulses, and follow classroom rules. Resources like FamilyEducation highlight this as a core component of school preparedness;

A PDF checklist will often include indicators such as the ability to calm down when upset, transition between activities without significant distress, and focus attention for reasonable periods. Assessing these skills via a checklist helps parents identify areas where their child might benefit from additional support before starting kindergarten. Developing these skills fosters a positive learning environment and successful classroom integration.

Following Directions

Many kindergarten readiness checklists, often found as convenient PDF documents, specifically assess a child’s ability to follow multi-step directions. These checklists, like those offered by Covenant Home, evaluate whether a child can comprehend and execute instructions involving two or three steps.

A PDF assessment will typically include observing if the child can listen attentively, remember the instructions, and complete the task accurately without constant prompting. This skill is fundamental for classroom success, as teachers rely on students’ ability to follow directions for activities and safety protocols. Identifying any difficulties through a checklist allows for targeted practice and preparation before the kindergarten transition.

Interacting with Peers

Kindergarten readiness checklists, frequently available as PDF downloads, dedicate a section to evaluating a child’s social skills, particularly their ability to interact positively with peers. These assessments, such as those found on FamilyEducation, look for behaviors like initiating play, responding to others, and participating in group activities.

A comprehensive PDF checklist will often include observing how a child handles social situations – do they share, take turns, and resolve conflicts appropriately? The ability to navigate these interactions is crucial for a successful kindergarten experience. Identifying areas for growth through a checklist allows parents to practice social scenarios and build confidence before school begins.

Sharing and Taking Turns

Many kindergarten readiness checklists, often offered as convenient PDF documents, specifically assess a child’s capacity for sharing and taking turns. Resources like those highlighted in online searches emphasize these skills as foundational for positive peer interactions and classroom harmony. These checklists evaluate whether a child understands the concept of fairness and can willingly relinquish possessions or wait for their opportunity.

A detailed PDF assessment might ask parents to observe their child in playdates or group settings. Can they share toys without distress? Do they understand the rules of taking turns in games? Developing these skills proactively, guided by checklist insights, prepares children for the collaborative environment of kindergarten.

Managing Emotions

Kindergarten readiness checklists, frequently available as downloadable PDF guides, place significant emphasis on emotional regulation. These resources, sourced from sites like FamilyEducation, highlight the importance of a child’s ability to identify and appropriately express feelings. A comprehensive PDF checklist will often include questions about how a child responds to frustration, disappointment, or anger.

Parents are typically asked to assess if their child can calm themselves down with minimal adult intervention, or if they exhibit frequent meltdowns. The goal isn’t to eliminate all negative emotions, but to observe the development of coping mechanisms. Mastering these skills, as indicated by the checklist, fosters a child’s social-emotional well-being and classroom success.

II. Early Literacy Skills

PDF kindergarten readiness checklists assess phonological awareness, letter recognition, rhyming, and story comprehension – foundational skills for early reading success, as noted online.

Phonological Awareness

Kindergarten readiness checklists, frequently available as PDF downloads, heavily emphasize phonological awareness. This crucial skill involves recognizing and manipulating the sounds within words – a key predictor of reading success. Assessments within these checklists often probe a child’s ability to identify beginning and ending sounds, blend sounds to form words, and segment words into individual sounds.

Resources like those found online highlight that strong phonological awareness isn’t about recognizing letters, but understanding the spoken language structure. A PDF checklist will typically include tasks like identifying rhymes, counting syllables, or isolating specific sounds, providing parents with a clear understanding of their child’s current abilities in this vital pre-reading area. Mastering these skills sets a strong foundation for decoding and ultimately, reading fluency.

Letter Recognition

Kindergarten readiness checklists, often distributed as convenient PDF documents, consistently assess a child’s ability to recognize both uppercase and lowercase letters. These checklists don’t necessarily require writing the letters, but rather identifying them visually. Resources emphasize that familiarity with letter names and shapes is a foundational skill for early literacy development.

A typical PDF checklist will include tasks like pointing to specific letters when named, or identifying letters within a group. While not all children will know every letter before kindergarten, a solid grasp of several is considered a positive indicator. These assessments help parents understand where their child stands and focus on areas needing improvement, preparing them for the alphabet-based learning that begins in kindergarten.

Print Awareness

Kindergarten readiness checklists, frequently available as PDF downloads, evaluate a child’s understanding of how print works. This goes beyond simply recognizing letters; it includes concepts like knowing that print carries meaning, and understanding the directionality of reading – left to right, top to bottom. These checklists assess if a child understands the function of books.

A PDF checklist might ask if a child knows the front of a book, or can point to where to begin reading on a page. It also checks if they understand that words are separated by spaces. Developing print awareness is crucial as it lays the groundwork for decoding and comprehension skills. Parents can use these checklists to support their child’s early literacy journey and ensure a smoother transition to kindergarten reading activities.

Rhyming Skills

Kindergarten readiness checklists, often found as convenient PDF resources, frequently include an assessment of rhyming abilities. This skill is a foundational element of phonological awareness, a key predictor of reading success. Checklists evaluate a child’s capacity to recognize and produce rhyming words – identifying words that sound alike.

A PDF assessment might present a word and ask the child to identify a rhyming match, or prompt them to generate their own rhyming word. Strong rhyming skills demonstrate an understanding of sound patterns within language. These checklists help parents gauge their child’s progress and provide targeted support. Mastering rhyming is a playful yet vital step towards becoming a confident reader and writer, preparing them for kindergarten literacy expectations.

Story Comprehension

Kindergarten readiness checklists, often available as downloadable PDF guides, assess a child’s ability to understand stories. This goes beyond simply recognizing words; it involves grasping the narrative, characters, and sequence of events. These checklists evaluate if a child can retell a story in their own words, answer simple questions about it, or identify the main idea.

A PDF assessment might involve reading a short story aloud and then asking comprehension questions. Strong story comprehension indicates developing cognitive skills crucial for academic success. Parents can use these checklists to identify areas where their child might need extra support, like practicing retelling stories or focusing on identifying key details. This skill builds a foundation for lifelong learning and critical thinking.

III. Mathematical Skills

PDF kindergarten readiness checklists evaluate number recognition, counting abilities, shape identification, and early measurement skills – foundational math concepts for school success.

Number Recognition

A key component assessed within a kindergarten readiness checklist PDF is a child’s ability to recognize numbers. This extends beyond simply reciting them in order; it involves identifying numerals visually – being able to point to the number ‘5’ and confidently state its value, for example.

Many checklists detail expectations for recognizing numbers 0-20, though some may focus initially on 0-10. Parents utilizing these resources can gauge their child’s progress and identify areas needing further practice. Resources like those from FamilyEducation and Covenant Home incorporate this skill into broader assessments.

Successful number recognition forms a crucial base for future mathematical concepts, enabling children to engage with counting, sorting, and ultimately, more complex problem-solving.

Counting Skills

Kindergarten readiness checklist PDFs frequently evaluate a child’s counting abilities, moving beyond rote memorization to demonstrate true understanding. This includes accurately counting a set of objects – up to 10 or 20, depending on the specific checklist – and understanding the concept of “one more” or “one less”.

Resources like those offered by FamilyEducation and Covenant Home often include tasks where children must count items and match that quantity to the corresponding numeral. A strong foundation in counting is vital, as it underpins later mathematical skills.

Checklists assess if children understand that the last number stated represents the total quantity, a critical step in developing number sense.

Shape Recognition

Kindergarten readiness checklist PDFs commonly assess a child’s ability to identify basic two-dimensional shapes – circles, squares, triangles, and rectangles. These checklists, available from sources like FamilyEducation and Covenant Home, don’t just test naming; they evaluate recognition even when shapes are presented in different sizes or orientations.

Many checklists include tasks where children must find specific shapes within a larger picture or group them together. Understanding shapes builds a foundation for geometry and spatial reasoning.

The ability to describe shapes (e.g., “a square has four equal sides”) is also sometimes included, demonstrating a deeper level of comprehension.

Sorting and Classifying

Kindergarten readiness checklist PDFs frequently include assessments of a child’s ability to sort and classify objects. Resources like FamilyEducation and Covenant Home highlight this skill as foundational for early math concepts. Checklists evaluate whether children can group items by color, shape, size, or type – for example, separating red blocks from blue ones.

More advanced checklists might present scenarios requiring classification by multiple attributes simultaneously. This demonstrates logical thinking and problem-solving skills.

The ability to explain why objects are grouped together is also often assessed, showcasing a child’s understanding of the underlying principles of categorization.

Basic Measurement Concepts

Kindergarten readiness checklist PDFs often assess a child’s initial grasp of basic measurement concepts. These checklists, sourced from resources like FamilyEducation and Covenant Home, don’t expect precise calculations, but rather an understanding of comparative terms. Can a child identify which object is “bigger” or “smaller”?

Checklists may include tasks like comparing the lengths of two pencils or determining which container holds “more” water. The focus is on developing a foundational understanding of quantity and size.

Understanding terms like “longer,” “shorter,” “heavier,” and “lighter” are key indicators, preparing children for more formal math instruction later on.

IV. Self-Help Skills

PDF kindergarten readiness checklists evaluate independence in areas like dressing, restroom use, and eating—skills vital for a smooth school transition.

Dressing Independently

A key component assessed within a kindergarten readiness checklist PDF focuses on a child’s ability to manage their clothing independently. This extends beyond simply putting clothes on; it includes mastering fasteners like buttons, zippers, and snaps. Resources emphasize that successful self-dressing builds confidence and reduces reliance on teachers for basic needs.

Checklists often inquire if a child can dress and undress themselves with minimal assistance. Being able to navigate clothing choices and put items on correctly—front to back, arms in sleeves—are important indicators. This skill contributes significantly to a child’s self-sufficiency and allows them to participate more fully in classroom activities without delays related to clothing adjustments.

Using the Restroom Independently

Many kindergarten readiness checklist PDF documents prioritize assessing a child’s restroom independence. This isn’t solely about potty training; it encompasses the entire process – recognizing the need to go, communicating that need, independently navigating the restroom, and successfully completing all steps of hygiene.

Checklists typically evaluate if a child can pull down/up pants, wipe themselves, flush the toilet, and wash their hands without constant prompting. Achieving this level of self-care is crucial for a smooth kindergarten transition, minimizing disruptions and fostering a sense of autonomy. Parents utilizing these checklists can identify areas needing practice before the school year begins, ensuring their child feels comfortable and confident.

Handwashing

A key component assessed within many kindergarten readiness checklist PDF resources is a child’s ability to wash their hands effectively and independently. This skill is paramount for hygiene and preventing the spread of germs in a classroom setting. Checklists don’t just look for the action of washing, but the quality of it.

Evaluations often include whether a child can wet hands, apply soap, scrub for at least 20 seconds (often linked to singing a song!), rinse thoroughly, and dry hands with a towel – all without significant adult assistance. Mastering this routine demonstrates responsibility and contributes to a healthier learning environment, making it a frequently highlighted skill in readiness assessments.

Eating Independently

Many kindergarten readiness checklist PDF documents emphasize a child’s ability to eat independently as a crucial self-help skill. This goes beyond simply holding a utensil; it encompasses managing lunchtime routines with minimal assistance. Assessments often evaluate whether a child can use a fork or spoon effectively, open food containers, and manage spills with reasonable self-control.

The checklists frequently note if a child can request help when needed, demonstrating appropriate communication skills alongside practical abilities. Being able to navigate mealtimes independently fosters confidence and allows teachers to focus on supporting other students, making this a key indicator of kindergarten preparedness.

Packing and Unpacking Backpack

A review of various kindergarten readiness checklist PDF resources reveals that independent backpack management is a frequently assessed skill. These checklists evaluate a child’s ability to open and close their backpack, retrieve necessary items like lunchboxes or folders, and put belongings away neatly. This demonstrates organizational skills and a growing sense of responsibility.

Successfully managing a backpack also indicates developing fine motor skills and problem-solving abilities. Parents utilizing these checklists often observe if children can identify their belongings and ask for assistance when encountering difficulties, showcasing both independence and appropriate help-seeking behavior – vital for a smooth kindergarten transition.

V. Gross and Fine Motor Skills

Kindergarten readiness checklist PDF documents often assess skills like running, jumping, pencil grip, and cutting, crucial for classroom participation and development.

Gross Motor Skills (Running, Jumping)

Kindergarten readiness checklist PDFs frequently include assessments of gross motor skills, vital for navigating the school environment and participating in physical activities. These checklists evaluate a child’s ability to run without frequent stumbling, jump with both feet, and demonstrate basic coordination.

The ability to hop, skip, and climb stairs independently are also commonly assessed. Proficiency in these skills contributes to a child’s confidence and participation in playground activities. Parents utilizing these PDF resources can observe their child during play to gauge their developmental progress.

A child demonstrating consistent difficulty with these movements might benefit from activities designed to enhance their gross motor development before starting kindergarten, ensuring a smoother transition.

Fine Motor Skills (Holding a Pencil, Cutting)

Kindergarten readiness checklist PDFs consistently emphasize the importance of fine motor skill development. These checklists assess a child’s ability to hold a pencil with a proper grip, crucial for early writing attempts. Furthermore, they evaluate scissor skills – specifically, the ability to cut along a line, even if imperfectly.

Other assessed skills include stringing beads, building with small blocks, and manipulating small objects. These activities build hand strength and dexterity. Parents using these PDF resources can observe their child during art projects or playtime.

Difficulties in these areas may indicate a need for focused practice before kindergarten, potentially through play-based activities designed to strengthen hand-eye coordination and fine motor control.

Hand-Eye Coordination

Kindergarten readiness checklist PDFs frequently include assessments of hand-eye coordination, recognizing its foundational role in numerous kindergarten activities. These checklists often evaluate skills like catching a ball, completing puzzles, and accurately copying simple shapes.

The ability to visually track an object and coordinate hand movements is vital for writing, cutting, and other classroom tasks. Parents utilizing these PDF resources can observe their child during play, noting their success with activities requiring coordinated movements.

Checklists may suggest activities to improve this skill, such as building with blocks or playing catch. Deficits in hand-eye coordination can impact a child’s ability to participate fully in classroom learning.

VI. Utilizing a Kindergarten Readiness Checklist PDF

PDF checklists from sources like FamilyEducation help track development; reliable options assess emotional, social, and academic growth, guiding parents toward preparedness.

Finding Reliable PDF Checklists

Locating trustworthy kindergarten readiness checklists in PDF format requires careful consideration. Numerous online resources offer these tools, but their quality and comprehensiveness vary significantly. FamilyEducation and Covenant Home are frequently cited as providing valuable, downloadable checklists designed to assess a child’s preparedness across multiple developmental domains.

When selecting a checklist, prioritize those created by educational professionals or organizations with expertise in early childhood development. Look for checklists that cover a broad spectrum of skills – social-emotional, early literacy, mathematical concepts, and self-help abilities. Ensure the checklist is clearly organized, easy to understand, and provides specific examples of skills to observe.

Be wary of checklists that appear overly simplistic or focus solely on academic skills, as kindergarten readiness encompasses much more than just pre-reading and pre-math abilities. A comprehensive PDF checklist will offer a holistic view of your child’s development, empowering you to identify areas of strength and areas needing further support.

Interpreting Checklist Results

Once you’ve completed a kindergarten readiness checklist PDF, careful interpretation is crucial. Remember, the checklist isn’t a pass/fail test, but rather a snapshot of your child’s current skill set. Don’t be alarmed if your child doesn’t demonstrate mastery in every area; development occurs at different paces.

Focus on identifying patterns. Are there several skills within a specific domain – like social-emotional development – where your child needs support? This highlights areas to prioritize. Note both strengths and areas for growth. A balanced perspective is key.

Consider the checklist results alongside your own observations of your child’s behavior and abilities. The PDF provides a structured framework, but your insights are invaluable. Use the results to inform a personalized action plan, focusing on fostering growth in identified areas.

Creating a Personalized Action Plan

After interpreting your kindergarten readiness checklist PDF, develop a targeted action plan. This isn’t about intensive tutoring, but rather incorporating skill-building into everyday activities. For literacy, read aloud frequently and practice rhyming games. For math, count objects during playtime and identify shapes in your environment.

Focus on one or two areas at a time to avoid overwhelming your child. Break down larger skills into smaller, manageable steps. Celebrate small victories to build confidence. Remember to make learning fun and engaging!

Utilize resources like online games, library books, and playdates to support your plan. Regularly revisit the PDF checklist to track progress and adjust your approach as needed. Consistency is key to fostering kindergarten readiness.

When to Seek Additional Support

If, after reviewing a kindergarten readiness checklist PDF, significant developmental delays are observed across multiple areas, seeking professional guidance is crucial. Don’t hesitate to consult with your pediatrician, preschool teacher, or a child development specialist.

Early intervention can make a substantial difference. Support services might include speech therapy, occupational therapy, or specialized preschool programs. Remember, identifying areas needing extra attention isn’t a sign of failure, but a proactive step towards ensuring your child’s success.

Utilize school district resources for evaluations and support. A comprehensive assessment can pinpoint specific needs and create a tailored intervention plan. Early support fosters confidence and prepares your child for a positive kindergarten experience.