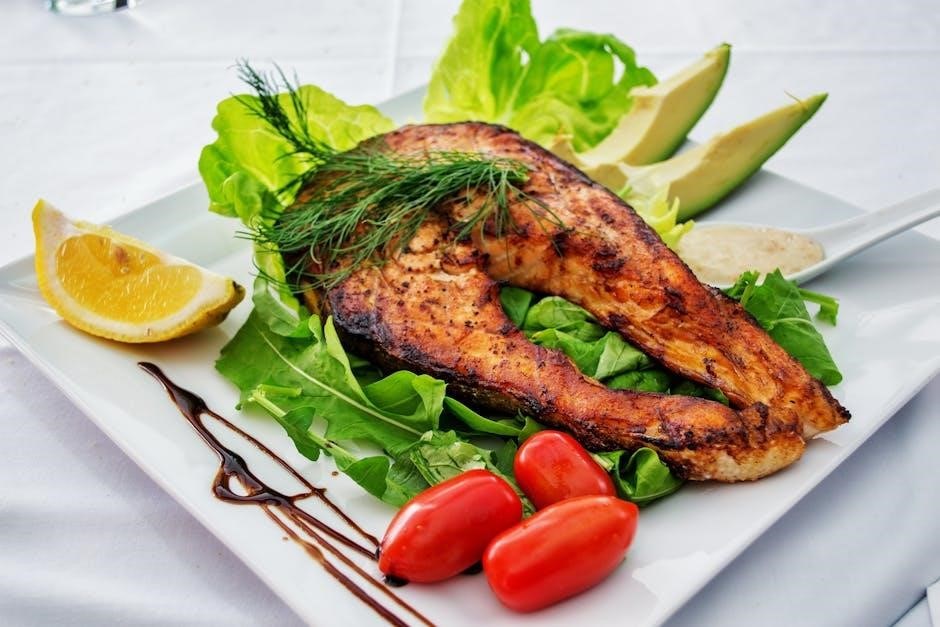
manual general electric air conditioner

Manual General Electric Air Conditioner⁚ A Comprehensive Guide

This guide provides comprehensive instructions for your General Electric air conditioner, covering installation, operation, troubleshooting, maintenance, and warranty information․ Access manuals online via the GE Appliances website using your model number․ Ensure safe and efficient operation following all safety precautions outlined in the manual․

Finding Your Model Number

Locating your GE air conditioner’s model number is crucial for accessing the correct manual and obtaining support․ This number, typically a combination of letters and numbers, uniquely identifies your specific appliance model․ It’s essential for ordering parts, troubleshooting issues, and finding relevant instructions․ The model number is usually found on a label affixed to the appliance itself․ Check the unit’s exterior sides, back, or top for a sticker or plate containing this information․ The label might be located near the power cord or air intake/outtake․ If the label is difficult to read or has become damaged, consider checking your original purchase documentation – receipts, invoices, or delivery notes may contain the model number․ Alternatively, you can carefully examine any packaging materials that may have been retained․ If you are still unable to find the model number, contact GE Appliances customer support, providing them with as much information as possible about your air conditioner, such as the year of purchase and any distinguishing features․ They should be able to assist you in locating the correct model number, enabling you to access the appropriate manual and support resources․

Locating the Owner’s Manual Online

Accessing your GE air conditioner’s owner’s manual online is a convenient and efficient way to obtain the necessary information․ GE Appliances provides a user-friendly website dedicated to locating manuals for their various products, including air conditioners․ To begin your search, navigate to the GE Appliances website and locate their support or manuals section․ This section typically offers a search bar where you can enter your air conditioner’s model number․ This model number, a unique identifier usually found on a label on the unit itself, is essential for retrieving the correct manual․ Once you’ve entered the model number, the website should provide a list of available documents, including the owner’s manual and potentially installation instructions․ Download the relevant PDF file to your computer or mobile device․ Ensure that you have a reliable internet connection to facilitate the download․ If you encounter any difficulties locating the manual using the model number, you can explore the website’s FAQs or contact GE Appliances customer support․ They may be able to guide you through the process or provide an alternative method to access the required documentation․ Always verify the authenticity of the downloaded manual by checking the source and the model number correspondence․

Downloading GE Air Conditioner Manuals

Downloading your GE air conditioner manual is straightforward once you’ve located it on the GE Appliances website․ The website typically presents the manual as a PDF document․ Before initiating the download, ensure you have sufficient storage space on your device to accommodate the file size․ A stable internet connection is crucial for a smooth and uninterrupted download process; a slow connection may result in incomplete downloads or download errors․ Once you’ve located the PDF, click the download button or link provided․ Your web browser will prompt you to save the file․ Choose a convenient location on your computer or mobile device and provide a descriptive file name for easy retrieval later․ After the download completes, verify the integrity of the downloaded file by checking its size and ensuring that it opens correctly․ If the file is corrupted or fails to open, try downloading it again or contact GE Appliances customer support for assistance․ The downloaded manual typically contains comprehensive information ranging from installation instructions to troubleshooting tips and safety precautions, ensuring you have all the necessary information at your fingertips․ Keep the downloaded manual readily accessible for future reference, especially during installation, troubleshooting, or routine maintenance․

Understanding Installation Instructions

GE air conditioner installation instructions are crucial for safe and effective operation․ These instructions, often included within the owner’s manual or available separately as a downloadable PDF, provide a step-by-step guide․ Thoroughly review all instructions before commencing installation․ Pay close attention to safety precautions, including electrical disconnections and proper grounding procedures․ The instructions will detail the necessary tools and materials․ Ensure you have everything on hand before beginning, as interruptions can be problematic․ The process typically involves preparing the window or designated installation area according to the specifications outlined in the manual․ Precise measurements and careful alignment are essential for a secure and efficient fit․ The instructions should clearly explain how to connect the unit to the power supply, ensuring proper grounding and avoiding potential electrical hazards․ Following the instructions meticulously is vital to prevent damage to the unit and ensure its optimal performance․ If any steps are unclear or you encounter any difficulties, seek professional assistance from a qualified technician rather than proceeding without a complete understanding․ Incorrect installation can void the warranty and pose significant safety risks․

Safety Precautions During Installation

Prioritize safety throughout the GE air conditioner installation process․ Before beginning, disconnect the power supply to prevent electrical shocks․ Never attempt installation during a thunderstorm or in wet conditions․ Use appropriate safety equipment, including gloves and eye protection, to avoid injuries from sharp edges or moving parts․ If working at heights, use a sturdy ladder and ensure a secure footing․ Consult the installation manual for specific weight and size details to prevent strain or injury during handling and positioning․ Proper grounding is essential to prevent electrical hazards; follow the instructions carefully․ Ensure adequate ventilation around the unit to prevent overheating․ Avoid placing the air conditioner near flammable materials․ If you encounter any difficulties during installation, such as damaged components or unclear instructions, discontinue installation and seek assistance from a qualified technician․ Do not attempt any modifications or repairs to the unit unless explicitly specified in the manual․ Remember that improper installation can lead to serious safety risks, including electrical shocks, fires, and personal injury․ Always prioritize safety and follow all guidelines provided in the installation manual․

Proper Window Installation Techniques

Precise window installation is crucial for optimal performance and energy efficiency of your GE window air conditioner․ Begin by carefully measuring your window to ensure compatibility with the unit’s dimensions․ Clean the window thoroughly before installation to provide a secure seal․ Use the included installation brackets to securely mount the air conditioner within the window frame, ensuring a snug fit to prevent drafts and leaks․ Apply weatherstripping or foam sealant around the edges of the unit to create an airtight seal, minimizing energy loss and noise․ The unit should be level to ensure proper drainage and efficient cooling․ Carefully follow the instructions provided in the manual for your specific GE model, as variations in design may necessitate slight adjustments to the installation process․ Do not overtighten screws or brackets, as this could damage the unit or window frame․ If the window is unusually shaped or requires special considerations, consult the manual or contact GE customer support for guidance․ A properly installed unit will enhance cooling performance and reduce energy consumption․ Take your time and meticulously follow each step of the installation instructions to ensure an effective and safe installation․ Remember that a poorly installed unit can result in reduced cooling efficiency and potential safety concerns․

Air Conditioner Operation and Controls

Operating your GE air conditioner is straightforward, but understanding its controls enhances comfort and efficiency․ Locate the control panel, typically on the top of the unit․ The power button is usually prominent, initiating the cooling cycle․ Adjust the temperature using the thermostat dial or digital display, setting your desired level of coolness․ Fan speed settings allow you to customize airflow—low for gentle cooling, high for rapid temperature reduction․ Many models include additional features like a sleep mode for energy savings during nighttime operation and potentially a timer function to schedule on/off cycles․ Some higher-end models might offer advanced settings such as health anion function, enhancing air purity․ Familiarize yourself with the indicator lights; they usually signal operation status, errors, or filter changes․ Refer to your model’s specific manual for detailed instructions and explanations of each control and function․ Proper use of these controls optimizes cooling and ensures energy efficiency․ Remember to consult the manual for any model-specific instructions or features․ Understanding the operation and controls will allow you to maximize comfort and energy efficiency․ Always adhere to safety guidelines outlined in your user manual to maintain the lifespan and efficiency of your air conditioning unit․

Troubleshooting Common Issues

Encountering problems with your GE air conditioner? Before contacting customer service, try these basic troubleshooting steps․ A unit failing to turn on might indicate a power issue; check the outlet and circuit breaker․ Insufficient cooling could stem from a dirty air filter; clean or replace it․ Unusual noises, like rattling or buzzing, might suggest loose components; inspect the unit for anything that seems out of place and tighten any loose screws․ Water leaks usually point to improper installation or a clogged drain; verify proper installation and check for blockages․ If the unit is blowing warm air, the refrigerant might need attention – a task best left to a qualified technician․ Error codes displayed on the control panel should be referenced in your user manual for specific solutions․ Remember to always unplug the unit before attempting any repairs․ If the problem persists despite these checks, consult the detailed troubleshooting section in your owner’s manual or contact GE customer support for assistance․ Attempting advanced repairs without proper knowledge can void your warranty and potentially cause further damage․ Regular maintenance, as described in the manual, can help prevent many common issues․

Maintenance and Cleaning Procedures

Regular maintenance is crucial for optimal performance and longevity of your GE air conditioner․ Begin by regularly cleaning the air filter․ Consult your manual for instructions on filter access and cleaning methods; typically, this involves removing the filter, gently rinsing it with water, and allowing it to completely dry before reinstalling․ A dirty filter restricts airflow, reducing cooling efficiency and potentially causing damage․ Inspect the unit’s exterior for dust and debris accumulation․ Use a soft brush or cloth to gently remove any visible dirt․ Avoid using harsh chemicals or abrasive cleaners that could damage the unit’s finish․ Inspect the condenser coils (located on the back or outside of the unit) for dirt and debris buildup․ If necessary, use a vacuum cleaner with a brush attachment to carefully clean the coils․ A buildup of dirt on the coils can significantly reduce cooling capacity․ Avoid using water directly on the coils, as this could cause electrical damage․ For more thorough cleaning, or if you notice unusual noises or performance issues, consider contacting a qualified service technician for professional maintenance․ Annual professional cleaning is highly recommended for maintaining peak efficiency and extending the life of your air conditioner․

GE Appliances Limited Warranty Information

Your General Electric air conditioner is protected by a limited warranty․ The specific terms and conditions of your warranty are detailed in the documentation that came with your unit, or can be found on the GE Appliances website; This warranty typically covers defects in materials and workmanship for a specified period, often one or more years․ To make a warranty claim, you will usually need to provide proof of purchase, such as your sales receipt, and the model number of your air conditioner․ The warranty may cover parts and/or labor, but it is crucial to carefully review the details of your warranty to understand what is and isn’t covered․ The warranty likely does not cover damage caused by misuse, neglect, or improper installation․ It’s essential to adhere to the manufacturer’s instructions for installation, operation, and maintenance to ensure that your warranty remains valid․ Before contacting GE Appliances regarding a warranty claim, carefully review the warranty document to ensure your issue qualifies for coverage․ Contacting GE Appliances customer service directly is often the first step in initiating a warranty claim, and they can guide you through the process․

Accessing Customer Service and Support

GE Appliances offers various avenues for customer service and support related to their air conditioners․ Their website typically provides a comprehensive FAQ section addressing common issues and troubleshooting steps․ You can often find answers to basic questions regarding operation, maintenance, and minor repairs without needing to contact customer service directly․ For more complex issues or warranty claims, the website usually provides contact information, such as phone numbers and email addresses, for dedicated customer support representatives․ These representatives can assist with troubleshooting, scheduling repairs, and addressing warranty claims․ The website might also offer options for online chat support, allowing you to communicate with a representative in real-time․ Be prepared to provide your model number and any relevant information about the issue when contacting customer service․ In some cases, GE Appliances may offer online forums or communities where users can share experiences and troubleshooting tips․ These resources can be helpful for finding solutions to common problems and connecting with other GE air conditioner owners․ Remember to always consult the official GE Appliances website for the most up-to-date contact information and support options․

Energy Efficiency and Saving Tips

Maximize your GE air conditioner’s energy efficiency and minimize energy consumption with these helpful tips․ Regularly clean or replace your air conditioner’s filter; a clogged filter restricts airflow, forcing the unit to work harder and consume more energy․ Properly maintain the unit according to the manufacturer’s instructions to ensure optimal performance and energy efficiency․ Consider using a programmable thermostat to automatically adjust the temperature based on your schedule, reducing energy waste during unoccupied periods․ Ensure your air conditioner is properly sized for your room or space; an undersized unit will work harder, while an oversized one may cool unevenly and use more energy than necessary․ Keep windows and doors closed while the air conditioner is running to prevent cool air from escaping and warm air from entering․ Use window shades or curtains to block direct sunlight from heating up your space, reducing the load on your air conditioner․ Regularly inspect and clean the condenser coils, removing any dirt or debris that may restrict airflow and reduce efficiency․ Consider upgrading to a more energy-efficient model if your current unit is outdated․ Look for models with Energy Star certification, indicating that they meet specific energy-efficiency standards․ By following these tips, you can significantly reduce your energy consumption, lower your utility bills, and extend the life of your GE air conditioner․

domain and range worksheet with answers pdf

Understanding Domain and Range

Understanding domain and range is crucial for comprehending functions․ The domain represents all possible input values (x), while the range encompasses all resulting output values (y)․ Worksheets offer valuable practice in identifying these sets from graphs, ordered pairs, and equations․ Mastering this concept strengthens your mathematical foundation․

Defining Domain and Range

In mathematics, the domain of a function refers to the complete set of possible values of the independent variable, typically denoted by ‘x’․ These are the input values for which the function is defined and produces a valid output․ The domain can be a discrete set of numbers, an interval, or even the entire set of real numbers, depending on the nature of the function․ For example, in the function f(x) = √x, the domain is restricted to non-negative real numbers because the square root of a negative number is not a real number․

Conversely, the range of a function represents the complete set of all possible resulting values, or outputs, of the dependent variable, usually denoted by ‘y’ or f(x)․ These are the values the function can take on given its input values from the domain․ The range, like the domain, can also be a discrete set, an interval, or the entire set of real numbers․ Understanding the domain and range helps to fully describe and visualize the behavior of a function and its graphical representation․

Identifying Domain and Range from Graphs

Graphically determining a function’s domain and range provides a visual understanding of its behavior․ To find the domain, examine the graph’s horizontal extent; the domain includes all x-values where the graph exists․ If the graph extends infinitely to the left and right, the domain is all real numbers․ However, if there are breaks or asymptotes, these limit the domain to specific intervals․ For instance, if the graph never touches or crosses a vertical line at x=a, then ‘a’ is not included in the domain․

Identifying the range involves analyzing the graph’s vertical extent․ Observe the lowest and highest y-values the graph reaches․ If the graph extends infinitely upwards and downwards, the range encompasses all real numbers․ Discontinuities or horizontal asymptotes, similar to vertical asymptotes affecting the domain, restrict the range to particular intervals or specific values․ These visual methods are particularly useful for understanding the limitations of a function’s input and output values․

Determining Domain and Range from Ordered Pairs

Ordered pairs, presented as (x, y), provide a discrete representation of a function’s input and output values․ Determining the domain and range from a set of ordered pairs is a straightforward process․ The domain consists of all unique x-values present in the ordered pairs․ Simply list each distinct x-coordinate; repetitions are ignored․ This set represents all possible inputs of the function defined by these pairs․ To find the range, focus on the y-values․ Collect all unique y-coordinates, again disregarding any duplicates․ This collection represents the set of all possible outputs generated by the function․

For example, given the ordered pairs {(1, 2), (3, 4), (1, 5), (6, 2)}, the domain would be {1, 3, 6} and the range would be {2, 4, 5}․ Note that repeated x or y values only appear once in the domain and range sets, respectively․ This method is fundamental for understanding function behavior when data is presented in this format, building a foundational understanding of input-output relationships․

Domain and Range Worksheets⁚ A Comprehensive Guide

Domain and range worksheets provide invaluable practice for students․ These resources offer various exercises, strengthening understanding and improving problem-solving skills related to functions․

Types of Exercises in Domain and Range Worksheets

Domain and range worksheets incorporate diverse exercise types to ensure comprehensive understanding․ Common exercises involve identifying the domain and range from graphs depicting various functions, including linear, quadratic, and cubic relationships․ Students practice determining the domain and range from sets of ordered pairs, presented either as lists or tables․ Some worksheets challenge students to find the domain and range of functions expressed algebraically, requiring them to consider restrictions on input values․ This might involve identifying values that lead to division by zero or result in the square root of a negative number․ Furthermore, many worksheets include interpreting domain and range in real-world contexts, applying the concepts to practical situations․ This multifaceted approach ensures that students develop a robust understanding of domain and range, and their application across various mathematical scenarios․ The inclusion of diverse problem types makes these worksheets effective tools for reinforcing the concepts and building problem-solving skills․

Benefits of Using Domain and Range Worksheets

Domain and range worksheets offer numerous benefits for students learning about functions․ Firstly, they provide targeted practice, reinforcing the key concepts of identifying the input and output values of a function․ Repeated practice through diverse problem types strengthens understanding and builds confidence․ Worksheets allow for self-paced learning, enabling students to work at their own speed and focus on areas where they need more support․ The availability of answer keys allows for immediate feedback, enabling students to identify and correct any misconceptions․ This immediate feedback is crucial for reinforcing correct understanding and avoiding the perpetuation of errors․ Furthermore, worksheets can serve as valuable assessment tools for teachers, providing insights into student understanding and areas needing further instruction․ The structured format of worksheets helps students organize their thoughts and approach problem-solving systematically․ In conclusion, the use of domain and range worksheets enhances learning efficiency and promotes a deeper understanding of fundamental mathematical concepts․

Finding Domain and Range of Different Function Types

Understanding how to determine the domain and range varies depending on the function type․ Linear functions, typically represented as y = mx + b, usually have a domain of all real numbers unless otherwise specified․ The range also typically spans all real numbers․ Quadratic functions, characterized by a squared term (e․g․, y = ax² + bx + c), often have a domain encompassing all real numbers; However, the range is restricted, depending on whether the parabola opens upwards or downwards, resulting in a minimum or maximum value․ Cubic functions (e․g․, y = ax³ + bx² + cx + d) generally possess both a domain and range of all real numbers․ More complex functions may have restrictions․ For example, rational functions (fractions with polynomials) have domain restrictions where the denominator equals zero․ Similarly, functions involving square roots restrict the domain to non-negative values under the radical․ Radical functions, such as square root functions, limit their domains to values that prevent negative numbers under the radical․ Mastering these distinctions is essential for accurate domain and range determination․

Practical Applications and Examples

Real-world scenarios frequently involve domain and range․ Analyzing data, modeling situations, and interpreting results often require identifying the input and output limitations․ Worksheets provide practical examples to solidify your understanding․

Domain and Range of Linear Functions

Linear functions, represented by equations of the form y = mx + b, where ‘m’ is the slope and ‘b’ is the y-intercept, exhibit straightforward domain and range characteristics․ The domain, encompassing all possible x-values, typically extends infinitely in both positive and negative directions, unless explicitly restricted․ This is represented as (-∞, ∞) or all real numbers (ℝ)․ The range, representing all possible y-values, similarly stretches infinitely unless constraints are applied․ This also translates to (-∞, ∞) or all real numbers (ℝ)․ However, certain real-world applications might impose limitations․ For instance, if the function models the cost of producing ‘x’ items, where ‘x’ must be a non-negative integer, the domain would become [0, ∞), and the range would depend on the cost function’s specifics, possibly also [0, ∞)․ Understanding these nuances is crucial for accurate interpretation and problem-solving․ Worksheets help you explore these variations and build a strong foundation in understanding domain and range within the context of linear functions, preparing you for more complex function types․

Domain and Range of Quadratic Functions

Quadratic functions, typically expressed in the form y = ax² + bx + c, where ‘a’, ‘b’, and ‘c’ are constants, present a slightly different scenario regarding domain and range․ Similar to linear functions, the domain of a quadratic function generally spans all real numbers, represented as (-∞, ∞) or ℝ, unless specific restrictions are imposed․ However, the range shows a more nuanced behavior․ The range depends critically on the parabola’s vertex, which is determined by the value of ‘a’․ If ‘a’ is positive, the parabola opens upwards, and the range is [vertex y-coordinate, ∞)․ Conversely, if ‘a’ is negative, the parabola opens downwards, leading to a range of (-∞, vertex y-coordinate]․ These ranges reflect the minimum or maximum y-values attainable by the function․ This understanding becomes crucial when solving real-world problems modeled by quadratic equations, where the range might signify practical limitations or boundaries․ Worksheets help solidify this understanding, providing diverse examples and reinforcing the connection between the parabola’s orientation and the resulting range․

Domain and Range of Cubic Functions

Cubic functions, generally represented as y = ax³ + bx² + cx + d (where a, b, c, and d are constants and a ≠ 0), exhibit a different pattern in their domain and range compared to linear and quadratic functions․ The domain of a cubic function, like linear functions, typically encompasses all real numbers, denoted as (-∞, ∞) or ℝ, unless explicitly restricted․ This broad domain reflects the continuous nature of cubic functions․ In contrast, the range of a cubic function also extends to all real numbers, (-∞, ∞) or ℝ․ Unlike quadratic functions which have a minimum or maximum value influencing their range, cubic functions have no such upper or lower bound on their output values․ Their graphs extend infinitely in both positive and negative y directions․ This unbounded nature stems from the cubic term’s dominance as x approaches positive or negative infinity․ Worksheets focusing on cubic functions help students visualize this unbounded range and contrast it with the restricted ranges seen in quadratic and other function types, promoting a deeper understanding of functional behavior․

Utilizing Domain and Range Worksheets for Practice

Practice worksheets are invaluable for solidifying understanding of domain and range․ They provide diverse examples and exercises, enabling students to master identifying these key aspects of functions․ Answer keys facilitate self-assessment and identify areas needing further attention․

Free Downloadable Worksheets

The internet offers a wealth of free downloadable domain and range worksheets, catering to various skill levels․ These resources often come in PDF format, making them easily printable and accessible․ Many websites provide worksheets with varying difficulty levels, allowing for differentiated instruction․ Some websites specialize in educational materials and offer comprehensive collections of domain and range exercises, often categorized by grade level or topic․ These free resources can supplement classroom learning or provide additional practice opportunities for students․ Look for worksheets that include a variety of problem types, such as those involving graphs, ordered pairs, equations, and different types of functions․ The availability of answer keys accompanying these worksheets is a significant advantage, allowing students to check their work and identify areas where they may need further review or assistance․ This self-assessment feature fosters independent learning and reinforces the concepts of domain and range․ Moreover, the free access to these resources makes them an economical and convenient tool for both students and educators․ By utilizing these downloadable worksheets effectively, students can build a strong understanding of domain and range and improve their overall mathematical skills․

Answer Keys and Solutions

Access to comprehensive answer keys and detailed solutions is invaluable when using domain and range worksheets․ These keys not only allow students to check their work and identify any mistakes but also provide a pathway to understanding the correct approach to solving problems․ A well-structured answer key should not merely provide the final answers but should also offer step-by-step explanations, showing the reasoning and calculations involved in arriving at the correct domain and range for each function or graph presented in the worksheet․ This detailed approach is crucial for students to learn from their mistakes and to truly grasp the underlying concepts․ The availability of solutions allows for self-paced learning, enabling students to work independently and identify areas where they might need further clarification․ Furthermore, answer keys can serve as a valuable tool for educators in assessing student understanding and identifying common misconceptions or areas requiring additional instruction․ The inclusion of both correct answers and detailed solutions enhances the effectiveness of domain and range worksheets, transforming them from simple practice exercises into powerful learning tools․

anchorage tv guide gci

GCI Anchorage TV Guide⁚ A Comprehensive Overview

The GCI Anchorage TV Guide offers a complete listing of channels and programming. Access schedules, search for shows by keyword, time, or channel. Explore various GCI TV packages and their channel lineups. Easily view listings by time and channel, ensuring you never miss your favorite shows.

Accessing the GCI Anchorage TV Listings

Accessing your GCI Anchorage TV listings is straightforward and convenient, catering to various preferences. For traditional methods, your GCI digital cable box provides on-screen guides, typically accessible through a dedicated button on your remote. Navigating this interface allows you to browse channels, view program schedules, and search for specific shows using keywords or titles. The level of detail provided often includes program descriptions, ratings, and sometimes even cast information. Remember that the specific interface might vary slightly depending on your cable box model. For a more comprehensive approach, GCI offers online access to its TV guide. This digital version often boasts advanced search capabilities, allowing you to refine your search parameters. Further enhancing accessibility, GCI might provide dedicated mobile apps for smartphones and tablets, mirroring the functionality of the online guide. This mobile app approach allows you to check schedules on the go, ensuring you’re always up-to-date on your favorite programs.

Understanding the GCI TV Guide Interface

The GCI TV guide interface, whether accessed through your set-top box, online portal, or mobile app, is designed for user-friendly navigation. The primary display usually presents a grid format, showcasing channels listed vertically and time slots horizontally. Each cell within this grid represents a program airing at a specific time on a particular channel. Key information, such as program titles and brief descriptions, are clearly visible within each cell. Many interfaces allow for customization, enabling users to sort listings by genre, alphabetical order, or even create personalized favorites lists. Advanced features may include parental controls, allowing for age-based filtering of content. Furthermore, the search functionality is often intuitive, supporting both simple keyword searches and more refined options, potentially including filters for specific dates, times, or actors. The color-coding of listings might indicate live sports, movies, or other program types, simplifying the process of identifying content matching your viewing preferences. Overall, GCI aims for a clean and efficient interface, ensuring that accessing program information is quick and easy for all users, regardless of their technical expertise.

Finding Specific Programs⁚ Search Functionality

GCI’s Anchorage TV guide boasts a robust search function designed to streamline the process of locating specific programs. This functionality extends beyond simple keyword searches, offering users a range of sophisticated filtering options. Users can input titles, actor names, or even partial keywords, and the search engine will return relevant results. Time-based filtering is also available, allowing users to refine their search to specific dates and times, ensuring they find programs airing within their preferred viewing window. Genre-based filtering further enhances the search process, enabling users to quickly find programs categorized by type, be it drama, comedy, sports, or news. The system often incorporates advanced algorithms to handle misspellings or variations in keyword phrasing, maximizing the chances of a successful search. Results are typically presented in a clear, easily digestible format, displaying program titles, air times, channel numbers, and brief descriptions. For those unsure of the exact program title, the search functionality often includes suggestions and auto-complete features, guiding users towards their desired content. This comprehensive search functionality ensures that users can efficiently locate their desired programming within the vast range of channels offered by GCI in Anchorage.

GCI Channel Lineups⁚ What Channels Are Available?

GCI’s channel lineups in Anchorage vary depending on the specific TV package subscribed to by the customer. Basic packages offer a selection of local channels, alongside a curated range of popular networks spanning news, entertainment, and family programming; Stepping up to more premium packages unlocks access to a significantly broader selection, including a wider array of sports channels, movie channels, and international programming options. High-definition (HD) channels are typically included in most packages, delivering a crisper and more detailed viewing experience. The exact channels available within each package are clearly detailed on the GCI website and within customer account portals. Customers can easily browse channel listings online, using interactive channel guides that display channel numbers, logos, and brief descriptions of each network’s programming. GCI also provides printable channel lineups for those preferring a physical copy. For those seeking specific channels or genres, using the online search functionality is recommended. Furthermore, customers can contact GCI customer service for personalized assistance in navigating the channel lineup options and selecting a package best suited to their viewing preferences and budget. The availability of certain channels may also be subject to location, so checking the specific Anchorage lineup is crucial.

GCI TV Packages and Channel Variations

GCI offers a range of television packages in Anchorage, each designed to cater to diverse viewing preferences and budgets. The basic packages provide access to local channels and a selection of popular networks, perfect for viewers seeking essential news, entertainment, and family programming. As you move up the tiers, the channel selection significantly expands. Mid-tier packages introduce more specialized channels, such as sports networks, movie channels, and premium entertainment options. The top-tier packages are comprehensive, encompassing a wide array of channels, including those offering high-definition (HD) broadcasts for superior picture quality. The channel variations between packages aren’t merely quantitative; they also represent qualitative differences. Higher-tier packages often include exclusive channels not available in lower-tier options, providing access to niche content and diverse programming genres. GCI regularly updates its package offerings and channel selections. Therefore, it’s advisable to check the latest information on the GCI website or through their customer service channels. The website provides detailed comparisons of each package, highlighting the specific channels included and any additional features, enabling customers to make an informed choice based on their viewing habits and financial considerations. This ensures subscribers receive the most suitable television package for their needs and preferences.

Viewing TV Listings by Time and Channel

The GCI Anchorage TV guide offers flexible options for viewing television listings, prioritizing user convenience. Users can easily browse listings organized by time, allowing them to see what’s airing at a specific time slot across all channels. This is particularly helpful for viewers with busy schedules wanting to plan their viewing in advance or quickly find something to watch immediately. Alternatively, viewers can explore listings sorted by channel, providing a comprehensive view of a particular channel’s programming schedule for the entire day or a specific period. This method is ideal for those who have a favorite channel or wish to explore the complete programming offered by a specific network. The guide’s design often incorporates visual cues, such as color-coding or icons, to distinguish between program types, such as movies, sports, news, or children’s programming. This visual enhancement adds another layer of clarity and helps users quickly identify programs that match their interests. Many online versions of the guide also allow users to filter listings by genre, further refining their search and making it easier to discover shows that appeal to their tastes. This feature is especially beneficial for those looking for specific types of content, streamlining the process of finding suitable programs within the vast selection offered by GCI. The combination of viewing options—by time and by channel, enhanced by visual cues and filtering—ensures a user-friendly and efficient television viewing experience.

Alternative Streaming Options for GCI Customers

While GCI provides traditional cable television services, Anchorage residents benefit from a variety of alternative streaming options to supplement or replace their cable subscriptions. Many streaming services offer on-demand content, live television channels, and a vast library of movies and shows, providing a flexible and cost-effective alternative to traditional cable packages. Popular streaming platforms such as Netflix, Hulu, Amazon Prime Video, and Disney+ offer extensive on-demand libraries of movies and television shows, catering to diverse viewing preferences. These services often provide original programming not available through traditional cable channels, expanding viewing options significantly. For viewers who prefer live television, services like YouTube TV, Sling TV, and fuboTV provide access to live channels, including local news and sports, often at a lower cost than traditional cable packages. These platforms typically offer various channel packages, allowing users to customize their viewing experience and select only the channels they desire, avoiding unnecessary costs associated with bundled cable packages. Furthermore, many streaming services are compatible with a wide range of devices, including smart TVs, smartphones, tablets, and computers, providing viewers with the flexibility to watch their favorite shows anytime, anywhere. This accessibility enhances convenience and caters to modern viewing habits, providing a seamless experience across multiple devices. The availability of these alternative streaming options complements GCI’s services, providing Anchorage residents with a broader range of choices to suit their individual entertainment needs and preferences.

Accessing GCI TV Listings Online and Via Apps

GCI offers convenient methods for accessing its Anchorage TV listings, catering to various user preferences and technological capabilities. For those who prefer online access, GCI’s website provides a user-friendly interface to browse current and upcoming programming. The website allows users to search for specific shows, browse channels by genre or category, and create personalized viewing schedules. This online platform is accessible from any device with an internet connection, offering flexibility and convenience. In addition to the website, GCI likely offers a dedicated mobile application for smartphones and tablets. This app mirrors the functionality of the website, providing on-the-go access to TV listings, allowing users to check programming details while away from home. The app may also offer additional features, such as personalized recommendations, reminders for favorite shows, and the ability to set recordings. These mobile applications are designed for user-friendly navigation, with intuitive interfaces optimized for smaller screens; Both the website and mobile app likely incorporate search functionalities, enabling users to quickly find specific programs or channels using keywords or channel numbers. This streamlined search functionality enhances the user experience, making it easy to find desired programming. The accessibility of GCI’s TV listings through both online and mobile app platforms ensures that users can access the information they need, regardless of their preferred method or device. Regular updates ensure that listings are accurate and reflect any changes in programming schedules.

Troubleshooting GCI TV Service Issues

Experiencing difficulties with your GCI TV service in Anchorage? GCI provides several resources to help resolve common issues. Begin by checking the GCI website for service outage reports in your area. These reports often pinpoint widespread issues, saving you time and effort. If no outage is reported, try restarting your cable box and modem. This simple step often resolves minor glitches. Check all cable connections to ensure they are securely attached. Loose or damaged cables can interrupt service. If problems persist, verify that your account is active and up-to-date. Contact GCI customer support directly via phone or online chat for personalized assistance. Their representatives can guide you through troubleshooting steps tailored to your specific situation, which might involve checking signal strength or modem settings. GCI’s website may offer a troubleshooting section with FAQs and guided solutions for common problems. This self-service option empowers you to address simple issues quickly. Before contacting support, gather relevant information such as your account number, the type of equipment you’re using, and a detailed description of the problem. This will expedite the troubleshooting process. Remember to regularly check your equipment for any signs of damage, such as frayed cables or flickering lights on your cable box, which may indicate underlying issues requiring professional attention. Proactive maintenance can prevent future problems and maintain optimal viewing.

Customer Support for GCI TV in Anchorage

GCI offers multiple avenues for customer support regarding its TV services in Anchorage. Their website provides a comprehensive FAQ section addressing common questions and troubleshooting steps, empowering you to resolve minor issues independently. For more complex problems or personalized assistance, GCI offers phone support with dedicated representatives ready to assist with billing inquiries, technical difficulties, or account management. Contact information, including phone numbers and operating hours, is readily available on the GCI website. For in-person assistance, locate the nearest GCI store using their online store locator. These stores offer face-to-face support for a wider range of issues. GCI also utilizes online chat support, offering real-time assistance for immediate queries. This convenient option allows for quick responses to urgent problems without the need for a phone call. Social media platforms, such as Twitter and Facebook, may also be utilized by GCI for customer support announcements or to address queries. They may also have a dedicated email address for customer service. When contacting GCI support, be prepared to provide your account number and a concise description of the issue you’re facing. This information enables quicker resolution and efficient service. GCI is committed to customer satisfaction and provides multiple touchpoints for accessing support tailored to individual preferences and needs, ensuring a seamless and positive experience.

GCI’s Future Plans Regarding TV Services

GCI’s future plans for TV services in Anchorage have undergone a significant shift. As of November 2024, GCI announced its intention to cease providing traditional cable TV services by mid-2025. This decision reflects a broader industry trend towards streaming services and a changing consumer landscape. While specific details regarding the transition remain to be fully disclosed, GCI is likely to focus its efforts on expanding and enhancing its streaming platform, Yukon TV. This platform offers on-demand and live TV options, providing a flexible alternative to traditional cable subscriptions. The cessation of cable TV services will impact existing customers, necessitating a transition to alternative solutions. GCI is anticipated to provide comprehensive support and resources to assist customers through this transition. This might include promotional offers, assistance in selecting suitable streaming packages, and detailed information on available options. GCI’s commitment to providing comprehensive communication services in Anchorage remains steadfast, even with this shift in its TV strategy. The company’s focus is expected to remain on delivering high-quality internet and mobile services, complemented by an enhanced streaming platform to meet the evolving needs of its customer base. Further announcements from GCI are anticipated to clarify the details of the transition and address any customer concerns.

Comparing GCI with Other Anchorage TV Providers

When comparing GCI with other Anchorage television providers, several factors come into play. While GCI is phasing out its traditional cable TV service, focusing on its streaming platform Yukon TV, other providers may offer a wider range of cable packages. Consider the channel lineups offered by each provider; some might feature more niche channels or specific sports packages that might not be available on Yukon TV. Pricing structures also vary significantly. While GCI emphasizes its streaming platform’s cost-effectiveness, other providers might offer competitive bundles combining internet, cable, and phone services. The availability of customer support and technical assistance differs across providers. GCI’s support systems are well-established, but other providers may offer 24/7 support or in-person assistance in addition to online resources. The level of internet speed required for streaming services is a key consideration. If you rely heavily on streaming, ensure your internet plan can handle the bandwidth demands of high-definition streaming, especially if multiple devices are used simultaneously. Finally, examine the contract terms and cancellation policies of different providers to avoid unexpected fees or commitments. It’s essential to evaluate your specific needs and preferences – such as the types of channels and services you require, your budget, and the level of technical support you need – before settling on a provider. A careful comparison of all options will help you choose the best solution for your viewing habits and overall entertainment needs in Anchorage.

lobes of brain and their functions pdf

The Four Lobes of the Brain

The human brain comprises four lobes⁚ frontal, parietal, temporal, and occipital. Each lobe specializes in distinct functions, though interconnectivity is crucial. The frontal lobe manages executive functions and motor control; the parietal lobe processes sensory information and spatial awareness; the temporal lobe handles auditory processing, memory, and language; and finally, the occipital lobe is responsible for visual processing.

Frontal Lobe⁚ Executive Functions and Motor Control

The frontal lobe, the largest of the brain’s four lobes, resides at the front of the cerebrum, extending back to the central sulcus. Its functions are multifaceted and crucial for higher-level cognitive processes. Executive functions, such as planning, decision-making, problem-solving, and working memory, are primarily controlled by the frontal lobe. It plays a vital role in regulating behavior, emotions, and personality. Furthermore, the frontal lobe houses the motor cortex, which initiates voluntary movements. Damage to this area can lead to impairments in motor control, speech production (Broca’s area), and cognitive flexibility. The prefrontal cortex, a significant part of the frontal lobe, is responsible for complex cognitive processes like abstract thought, foresight, and social behavior. Its development continues well into adulthood, explaining the gradual maturation of executive functions throughout adolescence and young adulthood. The intricate network of connections within the frontal lobe and its extensive communication with other brain regions underscore its integral role in overall brain function and human behavior.

Parietal Lobe⁚ Sensory Processing and Spatial Awareness

Situated behind the frontal lobe, the parietal lobe plays a critical role in processing sensory information from various parts of the body. It houses the primary somatosensory cortex, responsible for interpreting touch, temperature, pain, and pressure sensations. This area receives input from sensory receptors throughout the body, creating a detailed map of sensory experiences. Beyond basic sensory processing, the parietal lobe is crucial for spatial awareness and navigation. It helps us understand our body’s position in space and allows us to interact effectively with our environment. Higher-level cognitive functions, including visuospatial processing, attention, and language comprehension, also rely on the parietal lobe’s intricate neural networks. Damage to this area can result in difficulties with spatial reasoning, object recognition, and even basic sensory perception. The parietal lobe’s interconnectedness with other brain regions highlights its importance in integrating sensory information into a coherent understanding of the world around us, facilitating complex actions and cognitive processes.

Temporal Lobe⁚ Auditory Processing, Memory, and Language

Located beneath the parietal and frontal lobes, the temporal lobe is a crucial region for auditory processing, memory formation, and language comprehension. The primary auditory cortex, situated within the temporal lobe, receives and interprets sounds from the ears, enabling us to perceive and understand speech, music, and environmental sounds. Beyond auditory processing, the temporal lobe houses the hippocampus, a structure vital for forming new long-term memories. Damage to the hippocampus can severely impair the ability to create new memories, while leaving existing memories intact. The temporal lobe also plays a significant role in language processing. Wernicke’s area, located in the left temporal lobe for most people, is responsible for understanding spoken and written language. Lesions in this area can lead to Wernicke’s aphasia, characterized by fluent but nonsensical speech and difficulty comprehending language. The amygdala, another key structure within the temporal lobe, is involved in processing emotions, particularly fear and aggression, demonstrating the lobe’s multifaceted role in cognitive and emotional functions.

Occipital Lobe⁚ Visual Processing

Nestled at the rearmost part of the brain, the occipital lobe is the primary visual processing center. Visual information from the eyes is transmitted to the occipital lobe via the optic nerves, where it undergoes a complex series of transformations. The primary visual cortex, located within the occipital lobe, is responsible for initial processing of visual input, such as detecting edges, orientations, and movement. From there, the information is relayed to other areas of the occipital lobe and beyond for higher-level visual processing. This includes tasks such as object recognition, depth perception, and color vision. Different parts of the occipital lobe specialize in different aspects of visual processing, allowing us to interpret and understand the visual world. Damage to the occipital lobe can lead to various visual impairments, ranging from partial blindness to complete loss of vision (cortical blindness), depending on the location and extent of the damage. The occipital lobe’s intricate processing pathways are fundamental to our ability to navigate, interact with, and appreciate the visual richness of our surroundings.

Beyond the Four Lobes⁚ Other Important Brain Structures

The brain’s complexity extends beyond its four lobes. The cerebellum, crucial for coordination and balance, and the brainstem, controlling vital life functions, are essential for overall neurological well-being. These structures work in concert with the lobes, demonstrating the brain’s interconnected nature.

Cerebellum⁚ Coordination and Balance

Often called the “little brain,” the cerebellum is a significant structure located at the back of the brain, beneath the cerebrum. Despite its size, its role is immense, contributing significantly to motor control, coordination, and balance. The cerebellum doesn’t initiate movement; instead, it refines and coordinates movements initiated by other brain areas. Think of it as the brain’s fine-tuning system, ensuring smooth, precise movements. Its functions extend beyond motor control, impacting cognitive functions like language and attention. Damage to the cerebellum can lead to ataxia, characterized by difficulties with coordination, balance, and posture, manifesting as unsteady gait, tremors, and difficulties with fine motor skills. The cerebellum’s intricate structure, with its extensive connections to other brain regions, highlights its crucial role in maintaining both physical and cognitive equilibrium. Its contribution to motor learning is noteworthy; it adjusts and refines movements through repetitive practice, contributing to the development of skilled motor actions like playing a musical instrument or riding a bicycle. The cerebellum’s intricate network of neurons and its crucial role in motor coordination are vital to our daily functioning.

Brainstem⁚ Vital Life Functions

The brainstem, a stalk-like structure connecting the cerebrum and cerebellum to the spinal cord, is essential for survival. It’s composed of the midbrain, pons, and medulla oblongata, each playing a critical role in regulating fundamental life processes. The midbrain is involved in visual and auditory reflexes, as well as in regulating eye movement and sleep-wake cycles. The pons acts as a relay station, transmitting signals between the cerebrum and cerebellum, and also contributes to breathing regulation. The medulla oblongata, the lowest part of the brainstem, controls vital autonomic functions such as heart rate, breathing, and blood pressure. Damage to the brainstem can have severe consequences, potentially leading to life-threatening disruptions in these vital functions. Its central location and connections to other brain regions underscore its role as a critical hub for coordinating bodily functions essential for survival. The brainstem is a silent guardian, continuously monitoring and regulating these essential processes, ensuring the body’s smooth operation. Its importance is undeniable, given its responsibility for basic life-sustaining functions.

Interconnectivity and Collaboration of Brain Regions

Efficient brain function relies heavily on the intricate communication between its diverse regions. These regions don’t operate in isolation; instead, they collaborate seamlessly, sharing information and coordinating activities to achieve complex cognitive tasks and behaviors. This integrated network is vital for effective processing and response.

The Importance of Inter-Lobe Communication

The brain’s remarkable capabilities arise not only from the specialized functions of individual lobes but also from the seamless communication and collaboration between them. Consider a task as simple as reading⁚ visual information from the occipital lobe is crucial for recognizing words, but understanding their meaning requires the integration of language processing centers in the temporal lobe, working memory in the frontal lobe, and even spatial awareness from the parietal lobe to follow lines of text. More complex actions, like problem-solving or decision-making, involve even more intricate interplay. The frontal lobe, often considered the “executive” region, orchestrates these processes by directing information flow and integrating inputs from other lobes. This highlights the brain’s holistic nature; isolated lobe function is insufficient for complex cognitive functions. Damage to the communication pathways between lobes can lead to significant deficits, even if individual lobes remain structurally intact. Therefore, the interconnectivity of brain regions is paramount for higher-order cognitive processes and overall brain performance. The efficient exchange of information between lobes ensures a coordinated and comprehensive response to stimuli, enabling complex behaviors, learning, memory, and conscious experience. Without this inter-lobe communication, even basic tasks become challenging, revealing the critical role of interconnectedness in cognitive functions.

Impact of Brain Injury on Lobe Function

Brain injuries, whether traumatic or due to stroke or disease, can significantly impact lobe function depending on the location and extent of the damage. A frontal lobe injury might manifest as impaired judgment, difficulty with planning and problem-solving, or changes in personality and behavior. Damage to the parietal lobe can lead to sensory processing deficits, affecting spatial awareness, touch, and even the ability to recognize objects. Temporal lobe injuries can disrupt memory, language comprehension, and auditory processing, potentially causing difficulties with verbal communication or understanding spoken language. Occipital lobe damage primarily affects vision, leading to visual field defects, impaired object recognition, or even blindness. The severity of these effects varies greatly based on the injury’s size and location. Small, localized injuries might result in subtle impairments, while larger injuries can cause more profound and widespread deficits. Furthermore, the brain’s plasticity, its capacity to reorganize and adapt, influences the recovery process. Rehabilitation therapies can help individuals regain some lost function, but complete recovery isn’t always possible. Understanding the specific impact of brain injury on different lobes is crucial for accurate diagnosis, effective treatment planning, and predicting long-term outcomes. The intricate interplay between lobes means that even seemingly localized damage can have cascading effects on other brain regions and cognitive abilities.

Further Exploration⁚ Resources and Additional Information

For deeper understanding, explore reputable online resources and scientific publications offering detailed information on brain anatomy, function, and the impact of injury. Many PDFs and websites provide comprehensive overviews.

Recommended PDFs and Online Resources

To delve deeper into the intricacies of brain lobes and their functions, several excellent resources are available online and in PDF format. These resources often include detailed anatomical diagrams, functional explanations, and clinical correlations. Reputable websites of medical schools and neuroscience organizations provide comprehensive information on brain structure and function. Look for materials that clearly define the four lobes (frontal, parietal, temporal, and occipital), explaining their respective roles in higher-level cognitive processes, sensory integration, motor control, and language. Many PDFs are available from university departments of neuroscience or psychology, often containing lectures, review articles, or educational materials. Additionally, several reputable medical journals offer peer-reviewed articles on specific aspects of brain function, often available through online subscriptions or institutional access. When searching, ensure that the source is credible and reflects current scientific understanding. Be discerning and only rely on information from recognized experts and institutions in the field of neuroscience.

st martin st maarten travel guide

St. Martin/St. Maarten⁚ The Best Time to Visit

May-June and November-mid-December offer pleasant weather with fewer rain showers and attractive hotel rates. Summer and early fall bring hurricane risks and some business closures. Avoid mid-December to April for potentially higher prices and less favorable conditions.

Optimal Travel Months

For the ideal St. Martin/St. Maarten experience, target the shoulder seasons⁚ May and June, or November through mid-December. These months boast the best balance of pleasant weather and fewer crowds. Expect sunshine, comfortable temperatures, and lower hotel rates compared to peak season. Rain showers are less frequent during these periods, ensuring more time for outdoor activities. Enjoy the island’s beauty without the summer heat or the winter crowds, making your trip both enjoyable and budget-friendly. While hurricane season officially runs from June to November, these shoulder months generally see less intense weather activity compared to the heart of the summer.

Shoulder Seasons⁚ May-June & November-Mid-December

The shoulder seasons, May-June and November-mid-December, present a sweet spot for visiting St. Martin/St. Maarten. Expect agreeable weather with less rainfall compared to the peak summer months. Hotel rates are often more affordable during these periods, offering excellent value for your money. While hurricane season technically spans June to November, these shoulder months generally experience less intense weather, minimizing the risk of disruptions to your vacation. Enjoy a blend of pleasant temperatures and fewer crowds, allowing you to fully appreciate the island’s attractions without the hustle and bustle of peak season. It’s a perfect time to explore the diverse offerings of both the Dutch and French sides.

Hurricane Season⁚ Summer & Early Fall

Summer and early fall (June to November) constitute hurricane season in St. Martin/St. Maarten. While not every year brings significant storms, the risk of tropical cyclones is undeniably higher during these months. This period often sees increased rainfall and higher humidity levels. Many hotels and businesses may reduce operations or even close temporarily, limiting your activity options. Travel insurance is strongly recommended during this season to mitigate potential disruptions or cancellations due to severe weather. If you plan on visiting during these months, carefully monitor weather forecasts and be prepared for possible itinerary adjustments. Prioritize flexibility and consider alternative travel dates if you have concerns about potential storms.

Off-Season Considerations⁚ Mid-December to April

While St. Martin/St; Maarten enjoys pleasant weather year-round, the period from mid-December to April presents some travel considerations. This is peak season, attracting a significant influx of tourists, leading to higher prices for flights and accommodations. Availability for popular activities and restaurants may also be more limited. While the weather remains generally favorable, rain showers are more common during this time, though they are usually short-lived. Booking your flights and accommodations well in advance is crucial to secure your preferred choices and potentially obtain better rates. Factor in higher costs and potential crowds when planning your trip during these months.

Exploring the Island’s Two Sides

Discover the contrasting charms of Dutch Sint Maarten and French Saint Martin. Experience vibrant resorts and casinos versus a relaxed Caribbean ambiance and fine dining.

Dutch Sint Maarten⁚ Resorts, Shopping, and Casinos

Sint Maarten, the southern part of the island, offers a vibrant atmosphere with a focus on modern amenities and upscale experiences. Luxury resorts cater to diverse tastes, providing a range of accommodations from lavish suites to family-friendly options. The island is renowned for its extensive duty-free shopping, attracting visitors with a wide selection of goods from international brands. For those seeking entertainment, casinos provide a lively nightlife scene, adding to the island’s dynamic atmosphere. This blend of luxury, shopping, and entertainment makes Sint Maarten a popular destination for travelers seeking a diverse and exciting vacation.

French Saint Martin⁚ Relaxed Vibe, Dining, and Caribbean Charm

In contrast to the bustling atmosphere of Sint Maarten, French Saint Martin offers a more tranquil and laid-back experience. This side of the island is known for its charming villages, picturesque landscapes, and a slower pace of life. Foodies will delight in the diverse culinary scene, with numerous restaurants offering authentic French cuisine and Caribbean specialties. The relaxed ambiance, combined with stunning beaches and a rich cultural heritage, creates an idyllic escape for those seeking a more peaceful and authentic Caribbean getaway. Explore quaint streets, savor delicious meals, and soak in the unique charm of French Saint Martin.

Essential Travel Tips for St. Martin/St. Maarten

Plan your trip wisely, considering currency (both US dollar and Euro are widely accepted), reliable phone service, and other practical details for a smooth vacation experience. Enjoy!

Currency and Banking

Both the Dutch side (Sint Maarten) and the French side (Saint Martin) utilize different currencies. Sint Maarten primarily uses the US dollar, while Saint Martin uses the Euro. However, both currencies are widely accepted across the island. ATMs are readily available in tourist areas, offering convenient access to cash. Credit cards are also commonly accepted, particularly at larger establishments and hotels. Remember to notify your bank of your travel plans to avoid any issues with card usage abroad. For smaller businesses or local markets, carrying some cash is always recommended. Exchange rates may vary slightly between banks and exchange bureaus, so it’s beneficial to compare options before exchanging a significant amount of currency. Enjoy your shopping and dining experiences with a clear understanding of the local financial systems!

Phone Service and Communication

Maintaining communication while on St. Martin/St. Maarten is relatively straightforward. Cellular service is available through local providers, and most major international carriers offer roaming plans. Purchasing a local SIM card can be a cost-effective alternative for extended stays. Wi-Fi access is widely available in hotels, restaurants, and many public areas. For those seeking to make international calls, various options exist, including using your mobile phone’s international roaming capabilities, utilizing calling cards, or accessing internet-based calling services like Skype or WhatsApp. Remember to check with your carrier about international roaming charges and data usage before arriving to avoid unexpected expenses.

Other Practical Information for Your Vacation

Packing for your trip to St. Martin/St. Maarten should include light clothing suitable for warm weather, swimwear, sunscreen, insect repellent, and comfortable walking shoes. Remember to bring any necessary medications and consider travel insurance for unforeseen circumstances. The official languages are Dutch and French, but English is widely spoken, especially in tourist areas. While the island is generally safe, it’s always advisable to take standard precautions against petty theft. Enjoy the vibrant culture and diverse offerings of both the Dutch and French sides of the island, but always respect local customs and traditions. Plan your transportation in advance to make the most of your time.

Top Activities and Attractions

Explore stunning beaches, snorkel in crystal-clear waters, indulge in duty-free shopping, and discover the historical Fort Amsterdam. Experience the vibrant nightlife of Maho Village.

Beaches and Snorkeling

St. Martin/St. Maarten boasts a plethora of breathtaking beaches, each offering a unique charm. From the serene shores perfect for relaxation to vibrant stretches brimming with activity, there’s a beach for every preference. Many beaches provide excellent snorkeling opportunities, allowing you to explore the vibrant underwater world teeming with colorful coral reefs and diverse marine life. Discover hidden coves and secluded bays, perfect for escaping the crowds and enjoying the tranquility of the Caribbean Sea. Pack your snorkeling gear and prepare to be amazed by the underwater beauty that awaits.

Duty-Free Shopping

St. Maarten’s Dutch side is a shopper’s paradise, offering a wide array of duty-free goods. Explore the many stores and boutiques lining the streets, finding everything from luxury perfumes and designer clothing to electronics and local crafts. The absence of import taxes makes for significant savings on various items, attracting shoppers from around the world. Remember to check the specific regulations regarding duty-free allowances before you travel to maximize your shopping experience and avoid any potential issues. Don’t miss the opportunity to indulge in some retail therapy and find unique souvenirs during your visit.

Exploring Fort Amsterdam

Step back in time at Fort Amsterdam, a significant historical landmark on the Dutch side of St. Maarten. This well-preserved fort offers a fascinating glimpse into the island’s rich past, showcasing its strategic importance throughout various historical periods. Explore the fort’s ramparts, bastions, and other defensive structures, imagining the lives of those who once defended this crucial location. Enjoy panoramic views of Philipsburg and the surrounding waters from atop the fort. The fort’s museum houses artifacts and exhibits that detail its history and the island’s colonial past, making it a captivating destination for history buffs and casual visitors alike.

Maho Village and its Nightlife

Maho Village, situated near Princess Juliana International Airport, is renowned for its vibrant nightlife and thrilling proximity to airplanes. Experience the unique spectacle of watching massive jets soar incredibly low overhead as they land. This creates an unforgettable visual and auditory experience. Beyond the airport excitement, Maho Village boasts a lively atmosphere with a variety of bars, restaurants, and clubs catering to diverse tastes. From casual beachfront bars to upscale lounges, there’s something for everyone seeking an evening of entertainment. Enjoy live music, themed nights, and a diverse culinary scene, all set against the backdrop of the Caribbean Sea.

Getting Around the Island

Explore St. Martin/St; Maarten via taxis, local buses, or rental cars. Consider guided tours for a comprehensive island experience. Many options cater to diverse preferences and budgets.

Transportation Options

St. Maarten/St. Martin offers diverse transportation options to suit various needs and budgets. Rental cars provide flexibility for independent exploration, allowing you to discover hidden gems and scenic routes at your own pace. However, navigating the island’s sometimes narrow roads may require experience. Taxis are readily available, offering a convenient and cost-effective way to travel between destinations, especially for shorter distances. For a more budget-friendly option, public buses serve major areas, although their schedules might be less frequent and may not reach all corners of the island. Finally, organized tours provide a hassle-free way to experience specific attractions or to explore the island with a knowledgeable guide. Remember to factor in travel time when planning your itinerary, especially if you rely on public transport.

Taxi Services

Taxi services are widely available throughout St. Maarten/St. Martin, providing a convenient mode of transportation for visitors. Taxis are readily identifiable and usually operate on a metered system, ensuring fair pricing. However, it’s always advisable to agree on a fare beforehand, especially for longer distances or trips to less frequented areas. Negotiating a price upfront can help avoid misunderstandings and potential overcharges. Many taxi drivers are knowledgeable about local attractions and can offer recommendations for sightseeing or dining. While hailing a taxi on the street is possible, it’s often more reliable to arrange transport through your hotel or resort, or by contacting a reputable taxi company directly. This ensures a smoother experience and helps avoid any potential issues with finding a readily available taxi, particularly during peak hours or in less populated regions.

Local Tours and Guides

Enrich your St. Maarten/St. Martin experience with guided tours. Numerous local tour operators offer diverse excursions, from exploring historical sites like Fort Amsterdam to discovering hidden beaches and snorkeling spots. Consider booking a guided tour to gain insights into the island’s unique blend of Dutch and French cultures, history, and natural beauty. Many guides possess extensive local knowledge, providing valuable context and enhancing your appreciation of the island’s attractions. Choose from walking tours, boat trips, or customized itineraries tailored to your interests. Pre-booking is often recommended, particularly during peak season, to secure your preferred tour and guide. Research different tour operators to find one that aligns with your budget and travel style. Reading reviews from previous travelers can assist in selecting a reputable and experienced guide who can make your St. Maarten/St. Martin adventure truly memorable.

Accommodation Options

St. Maarten/St. Martin offers diverse lodging⁚ from luxurious resorts like La Samanna to a wide range of hotels and other accommodations to suit every budget and preference.

Luxury Resorts (e.g., La Samanna)

Indulge in the epitome of luxury at St. Martin/St. Maarten’s finest resorts. La Samanna, for instance, sets a benchmark for opulence, offering unparalleled amenities and impeccable service. Imagine yourself relaxing in lavish accommodations, savoring exquisite cuisine, and enjoying breathtaking ocean views. These resorts cater to discerning travelers seeking an unforgettable escape, providing a sanctuary of refined elegance and personalized attention. From private villas to luxurious suites, every detail is meticulously crafted to create an experience of unsurpassed comfort and sophistication. Unwind by the pristine pools, rejuvenate at world-class spas, and let the attentive staff anticipate your every need. Experience the ultimate in Caribbean luxury.

Variety of Hotels and Accommodations

Beyond luxury resorts, St. Martin/St. Maarten offers a diverse range of hotels and accommodations to suit every budget and preference. Find charming boutique hotels nestled amidst lush tropical gardens, offering a more intimate and personalized experience. For budget-conscious travelers, a selection of comfortable guesthouses and apartments provides affordable options without sacrificing convenience or location. Whether you seek a lively atmosphere near the bustling nightlife or a tranquil retreat on a secluded beach, you’ll discover a perfect match for your travel style. Explore family-friendly resorts with kids’ clubs and amenities, or find romantic hideaways ideal for couples seeking a secluded getaway. The island’s diverse lodging scene ensures a memorable stay for all.

aspire gotek x charging instructions

Aspire Gotek X Charging⁚ A Comprehensive Guide

Charging your Aspire Gotek X is straightforward. Use the included USB-C cable and connect it to a power source. A full charge takes under an hour. The LED indicator will illuminate blue during charging and flash white 20 times upon completion. Avoid charging with the pod attached to prevent potential taste issues.

Understanding the Battery

The Aspire Gotek X boasts a built-in 650mAh battery‚ a respectable capacity for a compact device like this. This battery provides sufficient power for a full day’s vaping for most users‚ making it ideal for on-the-go use. The battery’s performance can be affected by several factors‚ including usage intensity‚ the type of e-liquid used‚ and the age of the battery. Consistent‚ moderate vaping will generally yield a longer battery lifespan compared to intensive‚ continuous use. Understanding these factors helps in managing battery life effectively.

While the 650mAh battery offers substantial power‚ it’s crucial to remember that battery capacity diminishes with age and repeated charging cycles. Over time‚ the battery may not hold its charge as efficiently as when it was new. This is a normal process for rechargeable lithium-ion batteries found in most portable electronic devices. To maximize the lifespan of your Gotek X’s battery‚ follow the recommended charging practices outlined in this guide‚ and consider replacing the battery when you notice a significant decrease in battery life.

Charging the Gotek X

To charge your Aspire Gotek X‚ locate the USB-C charging port‚ typically situated at the bottom of the device. Connect the provided USB-C cable to this port‚ and then plug the other end into a suitable USB power adapter. A standard USB wall adapter with a 1A output is recommended for optimal charging speed and to prevent potential damage to the battery. Avoid using fast-charging adapters or power sources that exceed the device’s recommended input voltage‚ as this can negatively impact the battery’s health and lifespan.

During charging‚ the LED indicator light will illuminate‚ typically displaying blue. This confirms that the device is receiving power and charging correctly. The charging process usually takes less than an hour to reach a full charge‚ depending on the power source’s output and the battery’s current charge level. Once the battery is fully charged‚ the LED indicator will usually change its pattern‚ often flashing a specific color sequence (check your manual for specifics). Never leave your Gotek X charging unattended for extended periods‚ especially overnight‚ as this can potentially lead to overcharging and reduce the battery’s longevity.

LED Indicators⁚ Interpreting the Lights

The Aspire Gotek X utilizes an LED indicator light to provide feedback on its battery status and charging process. Understanding these light patterns is crucial for efficient device management. While the exact color codes might vary slightly depending on the specific Gotek X model‚ a common pattern involves using different colors to represent different charge levels. For instance‚ a solid red light might indicate a low battery‚ prompting you to connect the device to a power source for charging.

A solid blue light usually signifies that the device is actively charging. Once the charging process is complete‚ the LED indicator will typically change its behavior‚ often flashing a specific number of times in a certain color (e.g.‚ flashing white 20 times). This signals that the battery is fully charged and the charging process has automatically stopped. If the LED displays unusual patterns or remains inactive while plugged in‚ it could indicate a problem with the charging cable‚ power source‚ or the device itself‚ requiring further troubleshooting.

Charging Time and Efficiency

The Aspire Gotek X boasts a relatively quick charging time‚ typically completing a full charge in under an hour. This rapid recharge capability is a significant advantage‚ minimizing downtime and ensuring you can quickly return to vaping. However‚ the actual charging time might vary depending on factors like the power output of your USB charger and the current battery level. Using a higher-amperage charger (within the device’s supported range) can potentially reduce the charging time‚ while a lower-amperage charger might take slightly longer to fully replenish the battery. Always refer to the manufacturer’s specifications for the optimal charging parameters to avoid any potential damage to the battery or device.

For optimal battery health and longevity‚ it’s generally recommended to avoid completely depleting the battery before charging. Regular‚ smaller top-up charges are often preferred over infrequent‚ deep charging cycles. This practice helps maintain the battery’s overall capacity and extends its lifespan. Charging the Gotek X with the pod removed in rare instances may result in a better vaping experience‚ as charging with the pod attached might occasionally affect the taste.

Troubleshooting Charging Issues

If your Aspire Gotek X isn’t charging‚ first check the USB-C cable and port for any visible damage or debris. Ensure the cable is securely connected to both the device and the power source. Try a different USB cable and power adapter to rule out issues with your charging equipment. A faulty cable or adapter can prevent charging‚ even if the device itself is functioning correctly. If the problem persists‚ examine the charging port on the Gotek X for any obstructions. Sometimes‚ lint or other small particles can interfere with the connection‚ preventing proper charging.

The LED indicator on the Gotek X provides valuable feedback during charging. A constantly lit blue light indicates normal charging‚ while a blinking blue light might suggest a connection problem. If the LED light doesn’t illuminate at all‚ there might be a more serious issue with the device’s internal charging circuitry. If you’ve tried basic troubleshooting steps and are still experiencing problems‚ consult the official Aspire support resources or contact customer support for assistance. They can provide expert advice and potentially offer repair or replacement options.

Maintaining Your Gotek X Battery

Proper battery maintenance extends its lifespan. Avoid overcharging by disconnecting it once fully charged. Regularly inspect the charging port for debris. Using the included USB-C cable is recommended for optimal performance and safety;

Optimal Charging Practices

For optimal performance and longevity of your Aspire Gotek X battery‚ follow these best practices⁚ Always use the original USB-C cable provided with your kit. Avoid using third-party cables or chargers‚ as these may not provide the correct voltage or amperage‚ potentially damaging the battery or device. It’s crucial to charge your Gotek X in a well-ventilated area‚ away from direct sunlight or excessive heat. High temperatures can significantly reduce battery life and increase the risk of overheating or fire. Never leave your device charging unattended overnight or for extended periods. Once the battery is fully charged (indicated by the LED light flashing white 20 times)‚ unplug the device immediately. Regularly cleaning the charging port with a soft‚ dry brush can help ensure optimal contact and prevent charging issues. While the Gotek X can be used while charging‚ it’s generally recommended to charge it completely before each use for the best vaping experience. Consistent charging practices will contribute to your device’s overall performance and prolong its battery life. By following these guidelines‚ you’ll maximize your Gotek X’s battery performance and ensure a consistently satisfying vaping experience. Remember to consult the user manual for additional tips and safety information.

Avoiding Overcharging

Overcharging your Aspire Gotek X can significantly reduce its battery lifespan and potentially damage the device. The Gotek X’s battery management system is designed to prevent overcharging‚ automatically stopping the charging process once the battery reaches its full capacity. However‚ leaving your device plugged in unnecessarily after it’s fully charged can still put unnecessary stress on the battery. The LED indicator will flash white 20 times to signal a full charge. At this point‚ immediately disconnect the USB-C cable from your device. Avoid leaving your Gotek X plugged in overnight or for extended periods‚ even if the battery management system prevents overcharging. This prevents unnecessary heat generation‚ which can degrade the battery’s performance over time. While a fully charged battery is ideal for consistent vaping‚ consistently leaving it plugged in can negate this benefit. Regularly checking the charging status and unplugging promptly once fully charged is key to maintaining your device’s long-term health. Prioritize consistent‚ moderate charging over extended charging sessions. By being mindful of these steps‚ you can effectively avoid overcharging and ensure your Gotek X maintains optimal performance. Refer to your user manual for further clarification on charging procedures.

Battery Lifespan and Replacement

The Aspire Gotek X boasts a built-in 650mAh battery‚ designed for a full day’s use between charges for most users. However‚ the lifespan of any rechargeable battery is finite‚ influenced by charging habits and overall usage. Consistent overcharging‚ leaving the device plugged in after a full charge‚ and exposing it to extreme temperatures all contribute to accelerated battery degradation. To maximize battery longevity‚ adhere to the recommended charging practices⁚ charge fully but avoid prolonged charging sessions‚ and prevent extreme temperature exposure. The battery’s performance will gradually decline over time‚ indicated by shorter periods of usage between charges. When you notice a significant reduction in battery life‚ despite following best practices‚ it’s time to consider a replacement. Unfortunately‚ the Gotek X battery is not user-replaceable; it’s integrated into the device’s design. Contact Aspire customer support or an authorized retailer for battery replacement options or consider purchasing a newer model if repair isn’t feasible. Proper charging and care extend the device’s useful life. Remember that battery life is affected by many factors‚ and while a 650mAh battery is substantial‚ its longevity hinges on responsible usage and maintenance.

Beyond Charging⁚ Gotek X Usage

The Aspire Gotek X is draw-activated; simply inhale to vape. Ensure proper pod installation and filling with compatible e-liquids. Refer to the user manual for detailed instructions on device operation and troubleshooting common vaping issues.

Proper Pod Installation and Filling

Installing and filling the Aspire Gotek X pod is a simple process. Begin by ensuring the device is switched off. Locate the pod slot‚ usually a rectangular recess on the device’s side. The Gotek X pods utilize magnets for secure installation; simply align the pod with the slot and press gently until it clicks into place. A firm connection is crucial for proper operation and to prevent leaks. To fill the pod‚ locate the small‚ usually orange‚ rubber stopper on the side of the pod. Gently remove this stopper to expose the filling port. Using your chosen e-liquid‚ carefully fill the pod‚ avoiding overfilling to prevent leakage. Ensure the filling port is completely sealed by replacing the rubber stopper firmly. After filling‚ allow a few minutes for the coil to saturate with e-liquid before vaping to avoid dry hits. Always consult the manufacturer’s instructions and recommendations for compatible e-liquids and nicotine strengths. Improper filling techniques can lead to leaks‚ reduced performance‚ or damage to the device. Remember to check the pod’s fill level periodically to avoid running out of e-liquid during use.

Device Operation and Usage Tips

The Aspire Gotek X operates on a draw-activated system; simply inhale from the mouthpiece to activate vaping. No buttons or settings adjustments are required for basic operation. For optimal performance‚ ensure the pod is correctly installed and adequately filled with e-liquid. Avoid over-inhaling or taking excessively long puffs‚ as this can lead to overheating or a burnt taste. The device features multiple safety protections to prevent issues such as short circuits or overheating. However‚ always adhere to responsible vaping practices. Regularly clean the mouthpiece and contacts to maintain hygiene and optimal performance. If you encounter any issues‚ such as weak vapor production or unusual taste‚ check the e-liquid level‚ and ensure the pod is properly seated and the airflow isn’t obstructed. Avoid exposing the device to extreme temperatures or dropping it. Store it in a cool‚ dry place when not in use. Remember to consult the user manual for more detailed instructions and troubleshooting advice. Proper usage extends the device’s lifespan and ensures a consistently satisfying vaping experience.

Troubleshooting Common Vaping Issues

If your Aspire Gotek X produces weak vapor‚ first check the e-liquid level in the pod. A low level will result in reduced vapor production. Ensure the pod is correctly installed and firmly seated; a loose connection can also cause weak vapor. Examine the airflow; any obstructions will restrict airflow and reduce vapor. If the coil is burnt‚ indicated by a burnt taste or diminished vapor‚ replace the pod with a new one. A flashing white LED light ten times indicates a low battery; charge the device fully. If the device does not power on‚ it may be completely depleted. Attempt charging it; if it still fails to power on after charging‚ there may be a hardware issue‚ and you should consult the manufacturer or retailer. Unusual tastes‚ such as a burnt or metallic flavor‚ are usually caused by a burnt coil. Replace the pod to resolve this. Inconsistent vaping performance may sometimes be caused by the use of incorrect e-liquid viscosity. For optimal results‚ use 50VG/50PG e-liquids or nicotine salts as recommended. If problems persist despite these troubleshooting steps‚ contact Aspire’s customer support for further assistance.

missing 411 cluster map pdf

Missing 411 Cluster Map PDF⁚ An Overview

This overview examines the “Missing 411” phenomenon, focusing on cluster maps depicting disappearances in national parks and wilderness areas․ These maps, often created from data compiled by David Paulides, visually represent the spatial distribution of cases, sparking debate and various interpretations;

The Missing 411 Phenomenon

The “Missing 411” phenomenon centers around a collection of cases involving individuals who have vanished under mysterious circumstances, predominantly in national parks and wilderness areas across North America․ These disappearances often share unusual commonalities, defying conventional explanations․ Characteristics frequently noted include the inexplicable disappearance of experienced hikers or campers, often near water sources or in areas with unusual geological features․

While some cases might involve accidents or intentional disappearances, proponents of the “Missing 411” theory argue that a significant number exhibit patterns too unusual to be explained by standard investigative methods․ These cases often involve missing persons who seemingly vanish without a trace, leaving behind few clues, despite extensive search efforts․ The phenomenon has gained notoriety through books and documentaries by David Paulides, who compiles and analyzes these cases, presenting them as evidence of a larger, unexplained pattern․

Geographic Distribution of Cases

The geographical distribution of “Missing 411” cases, as depicted in various cluster maps, reveals a concentration in specific regions and types of locations․ While cases are reported across North America, certain national parks and wilderness areas appear as hotspots․ These areas often share characteristics such as dense forests, mountainous terrain, and extensive cave systems․ The clustering of cases in these locations is a key element in the “Missing 411” narrative, suggesting a possible link between the environment and the disappearances․

However, the apparent clustering may be influenced by factors such as reporting biases, higher visitor numbers in certain areas, and the uneven distribution of search and rescue resources․ Critiques of the “Missing 411” phenomenon often highlight the potential for such biases to skew the perceived geographic patterns․ Analyzing the distribution requires considering these potential confounding variables to assess the validity of any observed clustering․

Analysis of Missing Person Cases in National Parks

Analyzing missing person cases within the context of national parks reveals complexities․ While some cases align with the “Missing 411” profile—involving unusual circumstances and unexpected disappearances—many others do not․ A significant number of missing persons in national parks are found, often after extensive searches, highlighting the challenges of navigating vast and unpredictable wilderness areas․ The documented cases within national parks also show a wide range of circumstances, including accidental deaths, suicides, and intentional disappearances․

Furthermore, the sheer volume of visitors to national parks each year contributes to a high number of reported missing persons, some of whom are quickly located․ Attributing every case within a park to the “Missing 411” phenomenon overlooks the diversity of reasons for disappearances․ A thorough analysis necessitates a careful examination of individual cases, considering factors like environmental conditions, individual behavior, and investigative efforts․ Oversimplifying the data risks misinterpreting the actual circumstances surrounding these disappearances․

Data Sources and Methodology

The creation of Missing 411 cluster maps relies on various data sources, primarily the self-published research of David Paulides, supplemented by other reports and news articles․ The methodology involves compiling case details and plotting them geographically to identify potential clusters․

NamUs Data and Limitations

The National Missing and Unidentified Persons System (NamUs) is a crucial resource for missing person data in the United States․ While NamUs offers a comprehensive database, its data’s use in creating Missing 411 cluster maps presents several limitations․ Firstly, NamUs’s data encompasses all missing person cases, while Missing 411 focuses on those deemed to have unusual circumstances surrounding their disappearance․ This difference in scope means that direct comparison or integration of NamUs data into Missing 411 maps is problematic․ Furthermore, the completeness and accuracy of NamUs data vary due to reporting inconsistencies across jurisdictions and the time lag between a person going missing and their case being entered into the system․ This can lead to incomplete or inaccurate representations in any resulting map․ Therefore, while NamUs is a valuable tool for missing person data overall, its direct application to the specific parameters and interpretations of Missing 411 cluster maps requires careful consideration and acknowledgement of these inherent limitations․

David Paulides’ Research and Criticisms

David Paulides’ research forms the foundation for many Missing 411 cluster maps․ His work compiles cases of disappearances, often in national parks and wilderness areas, characterized by unusual circumstances․ Paulides highlights common features in these cases, suggesting potential patterns․ However, his methodology and conclusions have faced significant criticism․ Critics point to a lack of rigorous scientific methodology, alleging selective data inclusion, potentially biasing the results presented in his maps․ The “mysterious circumstances” criterion, central to his selection process, lacks a clear and consistently applied definition․ This ambiguity allows for subjective interpretation and the potential for confirmation bias․ Additionally, the absence of control groups or comparative analysis weakens the strength of his claims․ While Paulides’ work has popularized the Missing 411 phenomenon and stimulated public interest, its scientific validity remains questionable due to these methodological flaws and the lack of peer review․

Alternative Explanations and Skeptical Views

Skeptical viewpoints regarding the Missing 411 phenomenon and its associated cluster maps often challenge the presented narratives․ Critics highlight the inherent limitations of relying solely on anecdotal evidence and the potential for misinterpretations of spatial data․ Alternative explanations for disappearances in national parks and wilderness areas include accidental deaths, misadventure, and intentional concealment․ The vastness and challenging terrain of these locations contribute to the difficulty of search and rescue efforts, potentially leading to prolonged missing person cases․ Furthermore, the lack of comprehensive data and the potential for biases in data collection impact the accuracy and reliability of any analysis․ Some suggest that the perceived clustering of cases might be an artifact of uneven reporting or investigation efforts across different regions and jurisdictions․ The emphasis on unusual circumstances in Missing 411 cases, while intriguing, lacks a precise definition, leaving room for subjective interpretations and the selective inclusion of cases that support pre-conceived notions․ A more comprehensive and rigorously analyzed dataset, incorporating all missing person cases, is necessary for a robust assessment of the phenomenon․

Cluster Maps and Their Interpretation

Visualizing Missing 411 cases geographically, cluster maps highlight potential patterns and anomalies․ Interpreting these maps requires careful consideration of data limitations and potential biases for accurate conclusions․

Creating and Utilizing Cluster Maps

The creation of Missing 411 cluster maps typically begins with compiling data from various sources․ These sources might include police reports, news articles, and personal accounts of missing persons․ The data points, representing the locations where individuals disappeared, are then plotted on a geographical map․ Different mapping software or tools can be used to visualize this data․ The maps are often color-coded or use different symbols to distinguish between various aspects of the cases, such as age, gender, or circumstances of disappearance․ This allows for visual analysis of potential spatial clustering, identifying areas with a higher concentration of missing person cases than statistically expected․ These maps are then utilized to identify potential patterns or correlations between missing person cases and geographical features, such as national parks or areas with extensive cave systems․ The utilization of these maps is part of the ongoing investigation and discussion surrounding the Missing 411 phenomenon, prompting further research and analysis․ However, it’s crucial to remember these maps reflect only the reported cases and may not capture the complete picture due to reporting biases or limitations in data collection․

Interpreting Spatial Patterns and Clusters

Interpreting spatial patterns and clusters on Missing 411 cluster maps requires careful consideration․ The presence of clusters doesn’t automatically confirm a causal relationship; it simply indicates a higher concentration of cases in specific areas․ Several factors must be considered when analyzing these patterns․ One is the completeness and accuracy of the data used to create the map․ Incompleteness in reporting or biases in data collection can skew results․ Another important factor is the scale of the map․ A cluster might appear significant on a regional map but less so on a national map․ Similarly, the density of population in different areas must be accounted for․ Areas with higher population densities are expected to have more missing person cases simply due to higher numbers of people․ The types of terrain and environmental factors within the clusters should also be examined․ For instance, areas with extensive wilderness or cave systems might present unique challenges for search and rescue efforts, potentially contributing to the perception of clustering․ Statistical analysis techniques, such as spatial autocorrelation analysis, can help determine whether observed clusters are statistically significant or simply random occurrences․ Ultimately, interpreting these maps requires a multi-faceted approach․

Limitations and Biases in Map Representation

Missing 411 cluster maps, while visually striking, have inherent limitations and potential biases․ The data used to create these maps often comes from various sources and may not be consistently reliable or complete․ Data collection may be subject to biases, for example, focusing on cases with unusual circumstances rather than including all missing person cases, potentially creating a skewed representation․ Furthermore, the maps themselves may not accurately reflect the underlying spatial distribution due to limitations in data resolution․ For instance, a map might show a cluster in a large national park, but the actual cases might be concentrated in a smaller area within the park․ The selection criteria for including cases on the map can also introduce bias, potentially omitting cases that don’t fit the narrative․ Visual representations can be misleading․ The use of color schemes, point sizes, and map projections can influence how the viewer interprets the data․ Moreover, the absence of cases on a map does not necessarily imply the absence of missing persons in that location․ Finally, the maps often fail to consider factors such as population density, search effort, and reporting rates, all of which influence the number of reported missing persons in a given area․ These limitations highlight the need for cautious interpretation and further investigation․

aqua barista water dispenser manual

AquaBarista Water Dispenser⁚ A Comprehensive Guide

This guide provides a complete overview of the AquaBarista, a combined K-Cup coffee maker and water dispenser. Learn about setup, operation, maintenance, troubleshooting, and safety precautions. Find answers to frequently asked questions and access online resources for support.

Safety Precautions and Important Information

Before using your AquaBarista, carefully review these crucial safety measures. Always ensure the unit is placed on a level, stable surface at least four inches from any wall to ensure adequate ventilation and prevent tipping. Never operate the AquaBarista if the power cord is damaged or frayed; replace immediately. The dispenser heats water to temperatures exceeding 196ºF (91.5ºC), posing a significant scald risk. Exercise extreme caution when dispensing hot water, and keep children and pets away from the hot water spout. Always unplug the AquaBarista before cleaning, sanitizing, or performing any maintenance. Never immerse the unit in water or other liquids. Regularly inspect the water bottle and ensure it’s properly installed and free of cracks or damage. Dispose of used K-Cups and other waste appropriately. If you encounter any malfunctions or unusual behavior, immediately disconnect the power and contact customer support. Follow all instructions in the user manual for safe and effective operation. Failure to adhere to these safety guidelines may result in injury or damage to the appliance.

Installing the AquaBarista⁚ A Step-by-Step Guide

Begin by carefully unpacking your AquaBarista and inspecting all components for any damage. Ensure you have all parts listed in the user manual. Place the dispenser on a stable, level surface, at least four inches from the wall for proper ventilation. Open the dispenser door by sliding it upwards. Assemble the water bottle adapter securely, following the illustrated instructions in your manual. Insert the water bottle, ensuring a tight and leak-proof seal. Connect the water bottle to the dispenser’s internal plumbing. Close the dispenser door. Before plugging in, prime the water system by dispensing both hot and cold water until a continuous flow is established. This process might take approximately one minute for each tank. Then, locate and activate the hot tank heater switch. Allow approximately 15-20 minutes for the water to heat. Finally, plug the AquaBarista into a grounded 120V power outlet. Refer to the complete user manual for detailed illustrations and instructions. If any issues arise during installation, consult the troubleshooting section of the manual or contact customer support.

Understanding the AquaBarista’s Features

The AquaBarista is a versatile appliance combining a single-serve K-Cup coffee brewer with a convenient hot and cold water dispenser. Its compact design makes it ideal for homes or offices with limited counter space. The integrated K-Cup brewer allows you to prepare your favorite coffee beverages quickly and easily using Keurig K-Cup pods. The water dispenser provides both hot and cold filtered water on demand, perfect for drinking or other uses. Note that the AquaBarista is designed to work optimally with Keurig K-Cup branded products; using other pods might affect brewing performance. The dispenser features a user-friendly control panel, providing easy access to both hot and cold water dispensing functions. Safety features include an automatic shut-off for the hot water system to prevent overheating and potential burns. Regular cleaning and maintenance, outlined in the user manual, ensure optimal performance and longevity. The water bottle is easily accessible and replaceable, providing a streamlined process for refilling. The AquaBarista combines functionality, convenience, and safety for a superior beverage experience.

Water Bottle Installation and Preparation

Before installing the water bottle, ensure the AquaBarista is unplugged and the power switch is off. Locate the water bottle compartment, typically accessed by opening a door or panel on the dispenser. Carefully remove any existing bottle. Inspect the new water bottle for any damage. Clean the bottle thoroughly with warm soapy water, rinsing it thoroughly before installation. Wipe down the bottle cap and neck to eliminate any debris or dust. Insert the water bottle into the designated compartment, ensuring it sits securely and is aligned correctly with the dispenser’s internal components. The bottle should be inserted until it clicks into place or meets the designated stop point. Check for any leaks around the bottle connection once installed. Refer to the diagram in your user manual for detailed visual instructions on bottle installation. After installation, ensure the water bottle cap is tightly closed to prevent spills or leaks. Before using the dispenser, prime the water system by dispensing water from both the hot and cold faucets to purge any air from the lines. This will ensure smooth and uninterrupted water flow from both dispensing options.

Brewing Coffee with Your AquaBarista

Ensure the AquaBarista is properly plugged in and powered on. Select your desired cup size. Place a suitable mug or cup on the drip tray beneath the coffee dispensing spout. Open the K-Cup pod compartment. Insert a K-Cup pod into the designated slot, ensuring it’s correctly seated. Close the compartment securely. Press the brew button; the machine will begin the brewing process. The brewing time will vary depending on the selected cup size and the type of K-Cup pod used. Once brewing is complete, the machine will automatically stop. Carefully remove the used K-Cup pod from the designated receptacle. Dispose of the used pod according to your local recycling guidelines. If you experience any issues during the brewing process, refer to the troubleshooting section of your user manual or contact customer support for assistance. For optimal coffee flavor, use fresh, cold filtered water. Avoid using tap water with high mineral content, as this could affect the taste and potentially damage the machine. Remember to only use K-Cup branded products, as using other pods may affect the brewer’s performance. Regularly clean and descale your AquaBarista to maintain optimal coffee quality and extend the lifespan of your machine.

Cleaning and Sanitizing Your AquaBarista

Regular cleaning is crucial for maintaining the hygiene and optimal performance of your AquaBarista. Begin by unplugging the appliance from the power outlet. Allow the machine to cool completely before commencing cleaning. Wipe the exterior surfaces of the AquaBarista with a damp cloth and a mild, non-abrasive detergent. Rinse thoroughly with clean water and dry completely with a soft cloth. Empty the used K-Cup pod receptacle and rinse it thoroughly with warm water. Clean the drip tray using warm soapy water, ensuring all coffee residue is removed. Rinse and dry thoroughly. For more thorough cleaning, use a solution of equal parts white vinegar and water to clean the internal components. Fill the water reservoir with this solution, run a brew cycle, and then run a second cycle with plain water to rinse. To sanitize the water dispenser, use a solution of one teaspoon of bleach per quart of water. Fill the reservoir with this solution and run a dispense cycle for both hot and cold water. Then, run several cycles with plain water to remove any remaining bleach. Never immerse the AquaBarista in water or use abrasive cleaning agents. Refer to your user manual for specific instructions on cleaning the water filter and other internal parts. Regular cleaning and sanitizing will help to prevent the buildup of bacteria and limescale, ensuring your AquaBarista continues to provide delicious coffee and clean water for years to come.

Troubleshooting Common AquaBarista Issues

If your AquaBarista isn’t brewing coffee correctly, first check that you’re using a compatible K-Cup pod and that it’s properly inserted. Ensure the water reservoir is filled with sufficient water. If the coffee is weak, try using a stronger K-Cup blend or increasing the water level. If no water dispenses, verify that the water reservoir is filled and the dispenser is properly plugged in. Check for any blockages in the water lines. A lack of hot water might indicate that the heating element isn’t functioning correctly; consult your manual for troubleshooting steps or contact customer support. If the coffee maker is making unusual noises, check for any obstructions within the machine. If the machine is leaking, carefully inspect all connections and seals for any damage or loose fittings. A slow brewing process could be caused by a clogged filter or a low water level; check and clean the filter if necessary. If the machine is not powering on, check the power outlet and ensure the cord is securely plugged in. Examine the circuit breaker or fuse box to ensure there are no tripped breakers or blown fuses. If you’ve tried these steps and the problem persists, consult the detailed troubleshooting section in your AquaBarista user manual or reach out to customer support for assistance. Remember to always unplug the machine before attempting any internal cleaning or repairs.

Maintaining Your AquaBarista for Optimal Performance

Regular maintenance ensures your AquaBarista continues delivering delicious coffee and refreshing water. Begin by cleaning the exterior regularly with a damp cloth and mild detergent. Avoid abrasive cleaners or harsh chemicals that could damage the finish. The drip tray should be emptied and washed frequently to prevent spills and build-up. For more thorough cleaning, periodically descale the machine using a descaling solution specifically designed for coffee makers. Follow the instructions provided in your user manual for the appropriate descaling procedure. This process removes mineral deposits that can affect performance and taste. Inspect the water filter regularly and replace it according to the manufacturer’s recommendations. A clogged filter can restrict water flow and impact the quality of your beverages. The water bottle should also be cleaned periodically to prevent the growth of bacteria or mold. Always ensure the water bottle is properly sealed and installed before use. If you notice any unusual noises or malfunctions, consult the troubleshooting section of the manual before attempting any repairs. Routine maintenance, such as these simple steps, will extend the life of your AquaBarista and guarantee consistently excellent results. Remember to always unplug the appliance before performing any cleaning or maintenance tasks.

AquaBarista Specifications and Technical Details

The AquaBarista boasts a compact design, ideal for kitchens with limited counter space. Precise dimensions and weight specifications can be found in the printed user manual accompanying your unit. Power requirements typically involve a standard 120V electrical outlet, with the specific amperage clearly stated in the documentation. Water tank capacity varies by model; check your manual for details on the exact amount of water your AquaBarista can hold. The coffee brewing system is designed for use with Keurig K-Cup pods exclusively. Using other types of pods may lead to malfunctions or damage to the brewing mechanism. Hot water dispensing capabilities allow for various beverage options beyond coffee, such as tea or instant soups. The temperature of the dispensed hot water is regulated to ensure safety and optimal brewing conditions, although the specific temperature range might vary depending on your model. The machine incorporates safety features, such as automatic shutoff to prevent overheating or accidental burns. It includes a clear and concise digital display panel to facilitate user interaction and provide status updates. The machine’s overall construction combines durable materials with an aesthetically pleasing design. For comprehensive technical data including model numbers and serial numbers, refer to the information plate on the unit itself and the accompanying user manual.

Accessing the AquaBarista User Manual Online

While a physical copy of your AquaBarista user manual should have been included with your purchase, digital versions are readily available for convenient access. To locate the online manual, begin by visiting the manufacturer’s official website. The website’s support or downloads section will typically host a library of user manuals categorized by product model. Look for the AquaBarista section and select your specific model number for accurate documentation. Alternatively, a quick online search using keywords such as “AquaBarista user manual download” or “AquaBarista instruction manual PDF” will usually yield relevant results. Several third-party websites specializing in appliance manuals may also have the document available. However, always verify the source’s legitimacy to ensure you’re downloading a genuine manual. Once downloaded, you can save the PDF to your computer or mobile device for easy offline reference. If you encounter difficulty locating the online manual or experience problems with the downloaded file, contacting the manufacturer’s customer support is recommended. They can provide direct assistance in acquiring the necessary documentation. Remember to check regularly for updated versions of the manual, as new features or troubleshooting information might be added over time. A properly maintained and regularly consulted manual is a key element to getting the most out of your AquaBarista.

Customer Support and Contact Information

Should you encounter any difficulties with your AquaBarista, require assistance with setup, or need to report a malfunction, accessing reliable customer support is crucial. The manufacturer’s website is usually the first port of call. Look for a dedicated “Support,” “Contact Us,” or “FAQ” section, which may provide answers to common questions, troubleshooting guides, or contact details. Many manufacturers offer phone support during specific business hours, allowing you to speak directly with a representative. The website may also list email addresses for different support queries, enabling you to send detailed descriptions of your issue. For visual learners or complex problems, some manufacturers provide access to video tutorials or online chat support. If the manufacturer’s website doesn’t readily provide the needed contact information, consider searching online for their customer service number or email. Review sites or online forums may contain customer experiences with the company’s support service, which could prove beneficial. Before contacting support, gather relevant information such as your AquaBarista’s model number, the date of purchase, and a detailed description of the issue. This will help streamline the support process. Keep your purchase receipt or warranty information handy, as it may be requested during your interaction with customer service. Effective communication with the manufacturer’s customer support team is key to resolving any issues promptly and efficiently.

Frequently Asked Questions (FAQs) about the AquaBarista

This section addresses common queries regarding the AquaBarista water dispenser and coffee maker. A frequently asked question is about water bottle installation. Ensure the bottle is correctly seated in the designated area, following the instructions precisely to avoid leaks or malfunctions. Another common question involves the heating process. The time it takes for the water to heat depends on various factors, including the initial water temperature and the ambient temperature. Consult your manual for estimated heating times. Cleaning and sanitizing procedures are vital for maintaining hygiene and prolonging the lifespan of your appliance. Refer to the manual’s cleaning instructions for recommended cleaning agents and procedures. Troubleshooting issues like inconsistent coffee brewing or dispensing problems might require examination of the K-cup pod insertion, water filter condition, or potential blockages. Consult the troubleshooting section of the manual for solutions. Regarding water filter replacement, the frequency depends on water quality and usage. Check your manual for recommended replacement intervals. Understanding the different water temperature settings is crucial for optimal beverage preparation. The manual explains the various temperature options and their respective uses. Finally, if you encounter problems not covered in the FAQ or manual, contacting customer support is recommended for tailored assistance. Remember to have your model number and purchase information ready when contacting them.

energiser nimh battery charger manual

Energizer NiMH Battery Charger⁚ A Comprehensive Guide

This guide provides comprehensive instructions for using your Energizer NiMH battery charger. Learn about indicator lights‚ charging procedures for AA and AAA batteries‚ and troubleshooting common problems. Safety precautions‚ battery compatibility‚ and optimizing charging time are also covered. Proper battery insertion and charger maintenance are detailed for optimal performance and longevity.

Understanding the Charger’s Indicator Lights

Your Energizer NiMH battery charger employs LED indicator lights to communicate the charging status. A steady red light typically signifies that the charging process has begun. A blinking red light might indicate a problem with the batteries‚ such as a faulty cell or incorrect polarity. It’s crucial to check battery insertion and try again‚ or replace the batteries if the issue persists. A steady green light indicates that the batteries are fully charged and the charging cycle is complete. The charger may automatically shut off at this point‚ although the green light might remain illuminated. In some models‚ a yellow light may appear‚ indicating that the batteries have reached a certain charge level (e.g;‚ 50-99%). Always refer to your specific charger’s manual for precise interpretations of the indicator lights as variations exist between models. Understanding these light signals is key to ensuring proper charging and preventing potential battery damage.

Charging Instructions for AA and AAA NiMH Batteries

Before charging‚ ensure your batteries are compatible with your Energizer NiMH charger. Refer to your charger’s manual for specific compatibility details. Carefully insert the AA or AAA NiMH rechargeable batteries into the charger slots‚ paying close attention to the correct polarity (+ and -). Incorrect placement can damage the charger or batteries. Most chargers have clear markings to guide you. Once the batteries are securely inserted‚ plug the charger into a suitable power outlet. The indicator lights will illuminate‚ signaling the commencement of the charging process. The charging time varies depending on the battery capacity and the charger’s specifications. Consult your charger’s manual for estimated charging times. Do not leave the batteries charging for an extended period beyond what the manual recommends to avoid overcharging‚ which can reduce battery lifespan. Always monitor the indicator lights to determine when the charging cycle is complete. Once charged‚ remove the batteries from the charger. Avoid leaving batteries in the charger for prolonged periods after they are fully charged.

Troubleshooting Common Issues

If your Energizer NiMH charger isn’t working as expected‚ several troubleshooting steps can help. First‚ check the power connection. Ensure the charger is securely plugged into a functioning wall outlet. If the indicator lights aren’t illuminating‚ check the power cord for any damage. Examine the batteries for any signs of leakage or damage. Leaking batteries can damage the charger and pose safety risks. If the charger is still malfunctioning‚ verify that you’re using compatible NiMH rechargeable batteries. Attempt charging a known good set of batteries to rule out battery issues. If the indicator lights display an error code‚ consult your charger’s manual for specific troubleshooting guidance. The manual will likely detail the meaning of various light patterns and provide solutions. If the problem persists after these steps‚ contact Energizer customer support for further assistance. They may offer additional troubleshooting tips or advise on repair or replacement options. Remember to always exercise caution when handling batteries and electrical devices. Never attempt repairs beyond your skill level‚ and prioritize safety.

Safety Precautions and Important Notices

Always use only Energizer NiMH rechargeable batteries. Avoid charging other battery types to prevent damage or injury. Never disassemble the charger. Keep the charger away from children and pets. In case of malfunction‚ unplug immediately and contact customer support.

Battery Compatibility and Usage

This Energizer NiMH battery charger is specifically designed for use with Energizer NiMH rechargeable batteries. Using other battery types‚ such as alkaline‚ lithium-ion‚ or NiCd batteries‚ is strictly prohibited. Attempting to charge incompatible batteries can lead to serious consequences‚ including battery leakage‚ overheating‚ rupture‚ fire‚ or explosion. Always double-check the battery type before inserting them into the charger. Failure to use the correct battery type will void any warranty claims and may result in personal injury or property damage. The charger’s automatic safety features will detect and prevent charging of incompatible batteries in most cases‚ but this should not be relied on as the sole means of protection.

Proper usage involves inserting batteries correctly‚ ensuring proper polarity alignment (+ and -). Refer to the battery charger’s diagram for the correct orientation. Forcing batteries into the charger or using damaged batteries may damage the charger or cause malfunctions. Always inspect batteries before use for any signs of damage‚ such as swelling‚ corrosion‚ or leakage. Dispose of damaged batteries safely according to local regulations. Remember to unplug the charger when not in use‚ to conserve energy and prevent potential hazards. Always follow these guidelines to ensure safe and efficient charging of your Energizer NiMH batteries.

Proper Battery Insertion and Polarity

Correct battery insertion is crucial for safe and effective charging. Before inserting batteries‚ carefully examine the charger’s battery compartment. You’ll find clear markings indicating the positive (+) and negative (-) terminals. Align the positive terminal of each battery with the corresponding positive terminal marking inside the charger. Similarly‚ align the negative terminal of each battery with the negative terminal marking. Never force a battery into the charger; if it doesn’t slide in easily‚ double-check the polarity and try again. Forcing batteries can damage both the batteries and the charger‚ potentially leading to malfunction or safety hazards.

Reversed polarity is a common mistake that can prevent charging and may even damage the batteries or charger. If the charger is equipped with a safety mechanism‚ it may prevent charging if the polarity is incorrect. However‚ it’s best not to rely solely on this safety feature. Always visually confirm the correct orientation before inserting the batteries. The charger’s instructions may include a diagram illustrating the correct battery placement. Refer to this diagram if you have any doubts about battery insertion. Remember‚ correct polarity is essential for safe and efficient charging. If unsure‚ consult the complete instructions provided with your Energizer NiMH battery charger.

Advanced Charging Techniques and Tips

Explore techniques for optimizing charging time and extending battery life. Learn how to maintain your Energizer NiMH battery charger for peak performance and longevity. Proper care ensures reliable charging and maximizes the lifespan of your rechargeable batteries.

Optimizing Charging Time and Battery Life

To optimize charging time and maximize the lifespan of your Energizer NiMH rechargeable batteries‚ follow these guidelines. Avoid fully depleting batteries before recharging; this reduces the number of charge cycles. Partial charges are generally better than complete discharges. Always use the recommended charging time specified in your charger’s manual to avoid overcharging. Overcharging can damage the batteries and shorten their lifespan. Store your batteries in a cool‚ dry place when not in use. Avoid extreme temperatures‚ as these can affect battery performance and longevity. High temperatures‚ in particular‚ can degrade batteries more quickly. When storing batteries for extended periods‚ charge them to approximately 50% capacity. Avoid frequent full charge-discharge cycles‚ as these can stress batteries over time. Consider using a smart charger with features like trickle charging to maintain an optimal charge level without overcharging. By adhering to these tips‚ you can ensure your Energizer NiMH batteries maintain their peak performance and extend their usable life.

Maintaining Your Energizer NiMH Battery Charger

Proper maintenance ensures your Energizer NiMH battery charger continues to function efficiently and safely. Regularly inspect the charger for any signs of damage‚ such as cracks‚ broken parts‚ or frayed wires. If you notice any damage‚ discontinue use immediately and contact customer support or refer to the warranty information. Keep the charger’s vents clear of obstructions to allow for proper heat dissipation. Excessive heat buildup can damage internal components. Clean the charger’s contacts regularly with a dry‚ soft cloth to remove dust or debris. This helps ensure proper contact with the batteries. Avoid using abrasive cleaners or solvents‚ as these could damage the charger’s surface. Store the charger in a cool‚ dry place when not in use. Extreme temperatures or humid environments can affect the charger’s performance. Always unplug the charger from the power outlet when not in use or before cleaning. Never attempt to repair the charger yourself; this should only be done by qualified technicians. Following these maintenance procedures will help prolong the life of your Energizer NiMH battery charger and ensure its continued safe and reliable operation.

millermatic 211 manual

Millermatic 211 Manual⁚ A Comprehensive Guide

This guide provides a complete overview of the Millermatic 211 manual, covering various aspects from obtaining the manual in different formats to troubleshooting and welding parameters. It details safety precautions, parts lists, and welding processes like MIG and flux-cored, offering insights into advanced features such as infinite voltage control and welding capabilities for diverse materials and thicknesses.

Obtaining the Millermatic 211 Manual

Securing your Millermatic 211 manual is straightforward, with several avenues available. The primary source is MillerWelds.com, the official Miller Electric website. Here, you’ll likely find downloadable PDF versions of the owner’s manual, installation guides, and potentially even service manuals. Navigating the website’s support section or searching for “Millermatic 211 manual” should yield the desired results. Remember to check for multiple versions, as updates may be available. Alternatively, online resources such as manualzilla or other online document repositories may offer copies, though always verify authenticity and the source’s reliability before downloading. If you purchased your Millermatic 211 new, your purchase documentation should include information on accessing the manual either physically or digitally. Contacting Miller Electric’s customer service directly is another option; they can provide guidance or even send a physical copy of the manual if necessary. For those who prefer printed materials, consider checking online retailers selling manuals or contacting authorized Miller distributors for availability. Thorough research will help you obtain the precise Millermatic 211 manual you require for optimal use and maintenance.

Available Manual Formats and Access

The Millermatic 211 manual is readily accessible in several formats, catering to diverse user preferences. The most common format is the downloadable PDF, offering convenience and easy storage on various devices. These digital versions often include interactive features like hyperlinks, bookmarks, and searchable text, enhancing navigation and information retrieval. PDF manuals can be printed for those who prefer physical copies, although this may require significant paper usage. Some users might find the manual available as a text file (.txt), a simpler format suitable for basic text readers. However, this format usually lacks the formatting and visual elements of a PDF, potentially hindering readability. While less common, a printed version might be available directly from Miller Electric or authorized dealers. Access methods vary; the manufacturer’s website (MillerWelds.com) is a primary source, providing downloads in various formats. Online document archives or forums may also offer copies, but always verify authenticity and source reliability before use. If you purchased your welder new, documentation may have included a physical manual or instructions on accessing a digital version. In case of difficulty, contacting Miller’s customer support can resolve access issues, possibly guiding you towards the most suitable format for your needs and providing assistance in obtaining the necessary documentation.

Manual Contents⁚ Specifications and Details

The Millermatic 211 manual delves into the technical specifications and operational details of the welder. Crucially, it outlines the welder’s input voltage requirements, clarifying the necessary power supply for optimal performance. This information is vital for safe and efficient operation, preventing damage from incorrect voltage. The manual also provides detailed information about the output current and voltage ranges, enabling users to select the appropriate settings for various welding tasks and materials. Understanding these parameters is crucial for achieving high-quality welds. Further, it includes a comprehensive description of the wire feed system, explaining how to adjust the wire speed to achieve consistent arc stability and penetration. Detailed diagrams often accompany these descriptions, aiding comprehension. A complete parts list, often with part numbers, simplifies ordering replacement components or spare parts, aiding maintenance and repair. The specifications section also covers the machine’s duty cycle, indicating the maximum usage time before requiring a cooling-off period. This prevents overheating and potential damage to the welder. Moreover, the manual may contain detailed information about the different types of consumables compatible with the Millermatic 211, offering guidance for selecting the optimal materials for specific applications. Finally, safety-related specifications, such as grounding requirements and input power cord specifications, may be included, emphasizing safe and compliant usage.

Safety Precautions and Grounding

The Millermatic 211 manual emphasizes the critical importance of safety precautions before, during, and after welding operations. It stresses the absolute necessity of proper grounding to prevent electrical shocks, a potentially lethal hazard. The manual provides clear instructions on how to correctly connect the ground clamp to the workpiece and ensure a secure connection, minimizing the risk of electrical accidents. Detailed diagrams are often included to visually guide users through the grounding procedure. Beyond grounding, the manual covers crucial personal protective equipment (PPE) requirements, emphasizing the use of appropriate welding helmets with adequate shade numbers to protect eyesight from intense UV radiation and arc flash. It also underscores the need for protective clothing, including welding gloves, jackets, and footwear, to shield the body from sparks, spatter, and heat. The importance of proper ventilation is highlighted to mitigate exposure to harmful fumes and gases produced during welding. The manual may also detail emergency procedures in case of accidents, such as electrical shocks or burns, providing step-by-step instructions on how to respond and seek immediate medical attention. Furthermore, warnings against using the welder in wet or damp conditions are prominently displayed, preventing electrical hazards. The manual may also include specific instructions for handling consumables, such as welding wire and gas cylinders, to prevent injuries and explosions. Finally, it likely emphasizes the need to follow all local, state, and national safety codes and regulations.

Millermatic 211 Auto-Set Manual

The Millermatic 211 Auto-Set manual focuses on the automated features of this specific welder model. Unlike the standard Millermatic 211, the Auto-Set version simplifies the welding process through pre-programmed settings optimized for various materials and thicknesses. The manual details how to utilize these automated settings, guiding users through the selection process based on the type of metal being welded (steel, stainless steel, aluminum, etc.) and its gauge. It explains the advantages of using the Auto-Set function, such as improved ease of use for novice welders and increased consistency in weld quality. However, the manual also acknowledges the option to manually override the automated settings, providing instructions on how to adjust parameters like voltage and wire feed speed for more precise control. This section likely includes a detailed explanation of the welder’s control panel, clearly labeling each button, dial, and indicator light, and specifying their functions. The manual may also cover troubleshooting specific to the Auto-Set functions, helping users diagnose and resolve common issues related to automated settings. It might include a chart or table comparing the Auto-Set parameters to manual settings for different materials, enabling users to understand the differences and benefits of each approach. Furthermore, instructions for maintaining the Auto-Set functionality, such as regular cleaning and inspection of the control system, are likely included to ensure optimal performance and longevity. The manual may also highlight any limitations of the Auto-Set feature, specifying situations where manual adjustment may be necessary for optimal results.

Parts Manual and Spare Parts List

The Millermatic 211 parts manual is an essential resource for maintaining and repairing your welder. This section provides a comprehensive list of every component within the machine, meticulously cataloged with individual part numbers for easy ordering. Detailed diagrams, often exploded views, visually represent the assembly of various sub-assemblies, simplifying the identification of specific parts. Each part is clearly described, specifying its function and material composition. The manual doesn’t just list parts; it often categorizes them for quick reference, grouping similar components together (e.g., wire feed components, power supply parts, etc.). Beyond simple identification, the spare parts list often includes recommendations for routinely replacing consumable items, such as contact tips, nozzles, and drive rolls, along with their part numbers and suggested replacement intervals. This preventative maintenance information is crucial for extending the lifespan of the welder and ensuring consistent performance. The manual might also include diagrams illustrating the correct installation and replacement procedures for common parts, with detailed step-by-step instructions and safety precautions. Furthermore, the parts list may provide cross-referencing to compatible parts from other Miller models, offering alternatives if a specific component becomes unavailable. This ensures continued accessibility to necessary replacements, even for older machines. The document might also direct users to Miller’s official website or authorized dealers for ordering spare parts, ensuring authenticity and proper functionality.

Troubleshooting Guide and Solutions

The Millermatic 211 manual’s troubleshooting section is a valuable asset for resolving common issues encountered during operation. This section typically presents a systematic approach to diagnosing problems, often employing a flowchart or decision tree to guide users through a series of checks. The guide starts by identifying common symptoms, such as no weld output, wire feed problems, or erratic arc behavior. For each symptom, the manual offers a list of potential causes, ranging from simple issues like incorrect wire feed settings or gas supply problems to more complex mechanical or electrical faults. Each potential cause is followed by a step-by-step solution, clearly explaining how to address the problem and restore functionality. The solutions may involve adjusting settings, inspecting connections, replacing parts, or more involved procedures. Safety precautions are emphasized throughout the troubleshooting process, highlighting potential hazards and recommending safe practices. The manual may also include visual aids, such as diagrams or photographs, illustrating the location of specific components or the correct procedure for performing maintenance tasks. Furthermore, the guide might offer preventative maintenance tips to reduce the likelihood of future problems. It may suggest regular checks of consumables, such as contact tips and liners, and recommend cleaning or replacing them at specified intervals. By following the troubleshooting guide, users can effectively identify and resolve most issues, minimizing downtime and maximizing the machine’s operational efficiency. If a problem persists despite following the instructions, the manual will likely advise contacting Miller’s customer support for further assistance.

Welding Processes⁚ MIG and Flux-Cored

The Millermatic 211 manual thoroughly details the MIG (Gas Metal Arc Welding) and Flux-Cored Arc Welding (FCAW) processes, which the machine supports. For MIG welding, the manual explains the process’s fundamentals, emphasizing the role of shielding gas in protecting the weld pool from atmospheric contamination. It describes the various wire feed speeds, voltage settings, and travel speeds necessary for achieving high-quality welds in different materials and thicknesses. The manual provides guidance on selecting appropriate wire types and diameters for various applications, such as mild steel, stainless steel, and aluminum. Detailed instructions are given on setting up the equipment, including gas connections, wire spool installation, and gun adjustments. Illustrations and diagrams clarify the proper techniques for initiating and maintaining a stable arc, along with recommended techniques for different joint types and weld positions. The manual also addresses the importance of proper shielding gas coverage and the impact of various parameters on weld quality. For FCAW, the manual explains the unique aspects of this process, focusing on the self-shielding capabilities of flux-cored wires. It covers the selection of appropriate flux-cored wires based on the application and material, offering insights into the various types of flux cores and their suitability for different welding situations. The manual provides guidance on adjusting the welding parameters for optimal penetration and bead formation, emphasizing the importance of proper wire feed speed and travel speed control. Similar to the MIG section, it includes visual aids and step-by-step instructions for setting up the machine for FCAW and executing the welding process effectively. Safety precautions specific to both processes are prominently highlighted throughout the manual, ensuring users understand and address potential hazards.

Welding Parameters and Chart

The Millermatic 211 manual includes a comprehensive chart detailing optimal welding parameters for various materials and thicknesses. This chart serves as a crucial reference for users, providing recommended settings for voltage, wire feed speed, and travel speed to achieve high-quality welds consistently. The parameters are categorized based on the type of material being welded (e.g., mild steel, stainless steel, aluminum), wire diameter, and desired weld penetration. The chart usually presents data in a tabular format, making it easy to find the appropriate settings for a specific welding task. Each parameter’s impact on weld quality is explained, allowing users to understand the rationale behind the recommended settings. For instance, the manual might detail how increasing voltage leads to greater penetration but also increases the risk of burn-through, whereas higher wire feed speeds enhance deposition rate but might compromise weld bead profile. The manual also emphasizes the importance of adjusting parameters based on the specific application and environmental conditions. Factors such as ambient temperature, wind speed, and material cleanliness can influence the optimal welding parameters. The chart often features footnotes or additional notes to clarify any specific considerations or limitations related to particular settings. The manual may also recommend starting with the chart’s suggested settings as a baseline and then making minor adjustments based on the observed weld characteristics. The user is encouraged to observe the weld bead, check for penetration, and assess the overall quality to fine-tune the settings for optimal results. Visual aids, such as weld bead examples, may be included to help users understand the impact of different parameter combinations on the final weld. The manual’s emphasis on understanding the interplay of welding parameters empowers users to troubleshoot issues and produce superior welds.

Advanced Features⁚ Infinite Voltage Control

The Millermatic 211’s infinite voltage control is a standout feature, granting welders precise control over the welding process. Unlike machines with stepped voltage settings, the infinite control allows for seamless adjustments across the entire voltage range. This nuanced control is particularly beneficial when welding materials like aluminum or stainless steel, which require specific voltage settings to avoid issues like burn-through or insufficient penetration. The manual details how this feature enhances versatility. It explains how to utilize the infinite voltage control to fine-tune the arc characteristics, optimizing the weld pool for different applications. For example, a lower voltage might be preferred for thin materials to prevent burn-through, while a higher voltage might be necessary for thicker materials to ensure adequate penetration. The manual likely provides guidance on selecting the appropriate voltage for various wire diameters and gas types. It might also include troubleshooting tips for situations where the infinite voltage control isn’t producing the desired results. Understanding the relationship between voltage, wire feed speed, and travel speed is emphasized to achieve consistent, high-quality welds. The manual might illustrate how to adjust the voltage to compensate for changes in material thickness or environmental conditions. Furthermore, the manual could offer examples of specific welding scenarios where the infinite voltage control provides significant advantages. It might highlight instances where precise voltage control is crucial for achieving superior weld quality in demanding applications. For instance, welding aluminum, known for its sensitivity to heat, requires the precision offered by this feature. The infinite voltage control, therefore, elevates the Millermatic 211 beyond basic MIG welding, offering experienced welders enhanced capabilities and precision.